Pruning

The Natural Prune

(Originally posted: July 6, 2020)

Pruning season is in full effect now. It’s a fun time of year because as early-blooming shrubs come out of bloom, it is generally the perfect time to prune them before they begin setting flower buds for next year.

Pruning can be a daunting task for many gardeners who are often incapacitated by the thought of timing things properly and the fear of killing their plants. Rest assured, if you time your pruning immediately after the flowering period, and remove no more than one third of the plant, your plant should be fine and flower again next season. (I said *should* because there are always exceptions, and if the plant is stressed in other ways such as through drought or nutrient deficiencies, the ability of the plant to rebound from pruning can be compromised. Additionally, some plants are more tolerant of a ‘haircut’ than others.)

I think that in reality, the main concern when it come to pruning should be disfiguring a plant- which happens all too often. Plants, like people, come in all shapes and sizes; and, also like people, the natural growth habit of a plant is what contributes to it’s natural beauty. This is why it drives me CRAZY when I see hedge shears used as a general all-purpose pruning tool (especially by landscape crews).

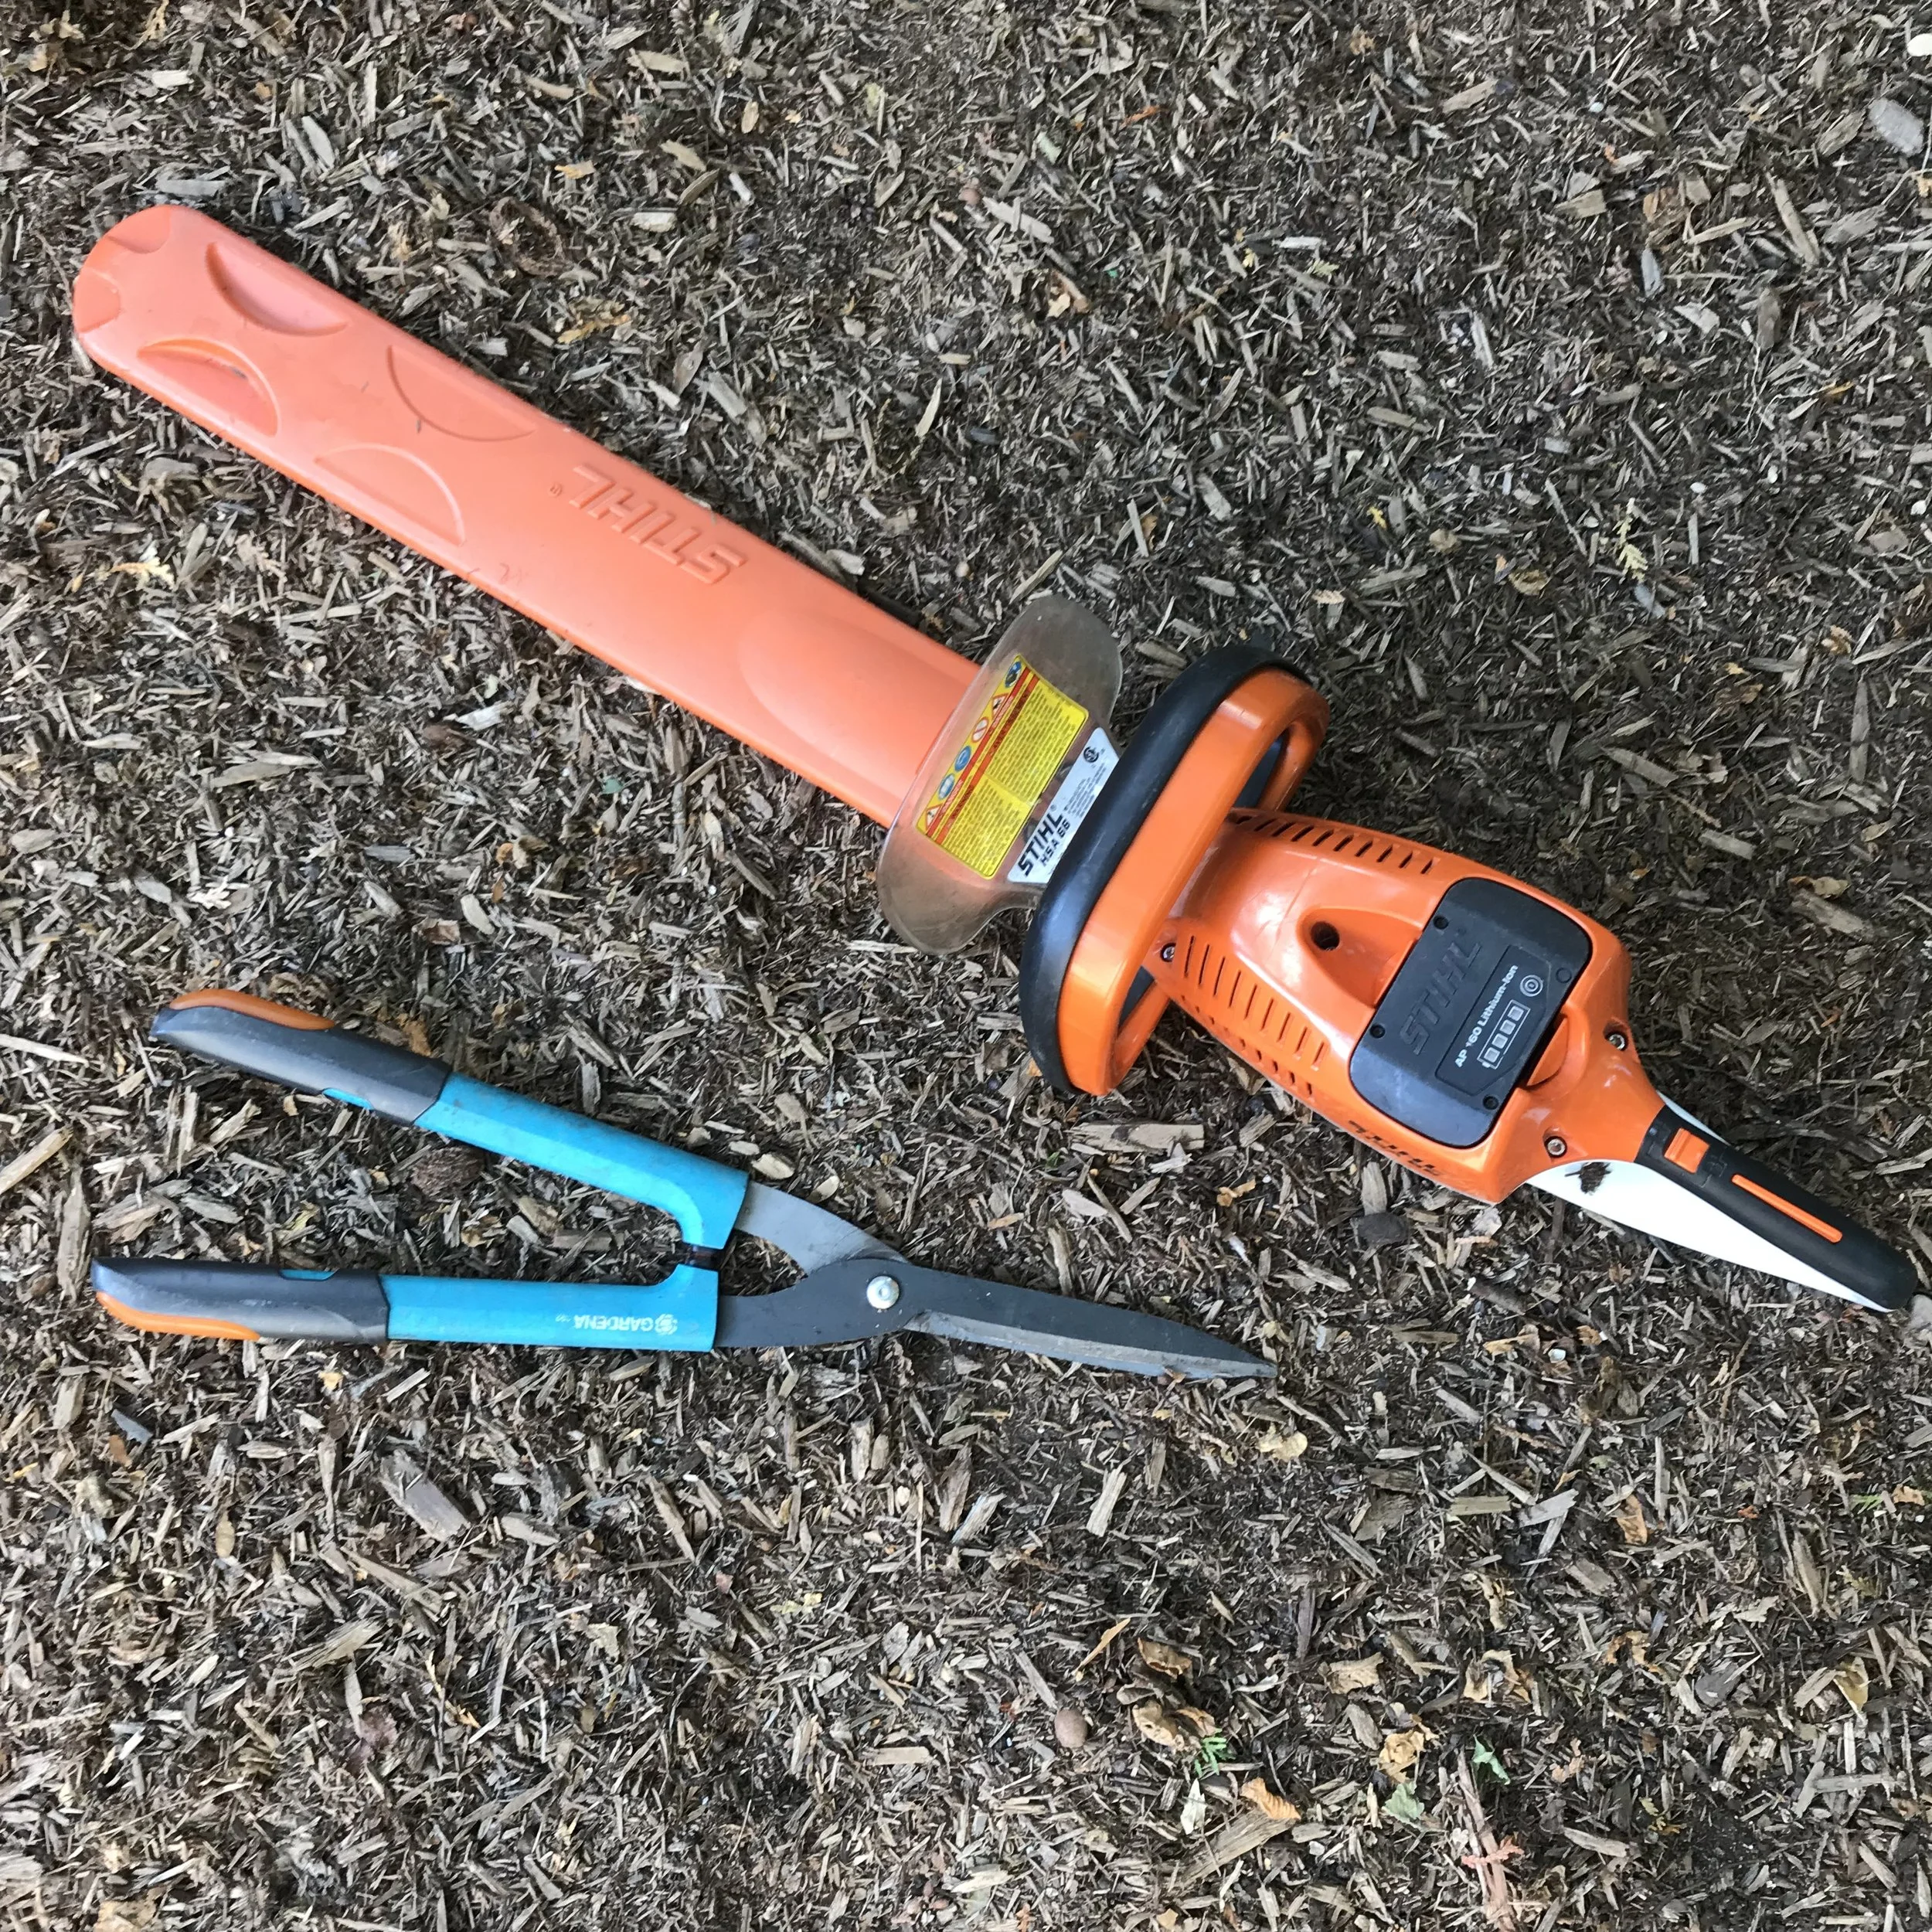
Don’t get me wrong- I love my hedge shears BUT they serve a specific purpose and that is for pruning hedges.

Hedge shears should only be used for one thing and that thing is….

anyone…

anyone…

Bueller?

The answer is HEDGES!!!!

Hedge shears are great for pruning things into lines, tight globes, pyramids, random animal shapes… but when it comes to flowering shrubs, they absolutely decimate the natural growth habit of a plant. (If you are a person who likes all the plants in your garden to be rounded- you are not alone, many people do, however this is not the post for you! You may now save yourself a few minutes of time and gracefully bow out of this article.)

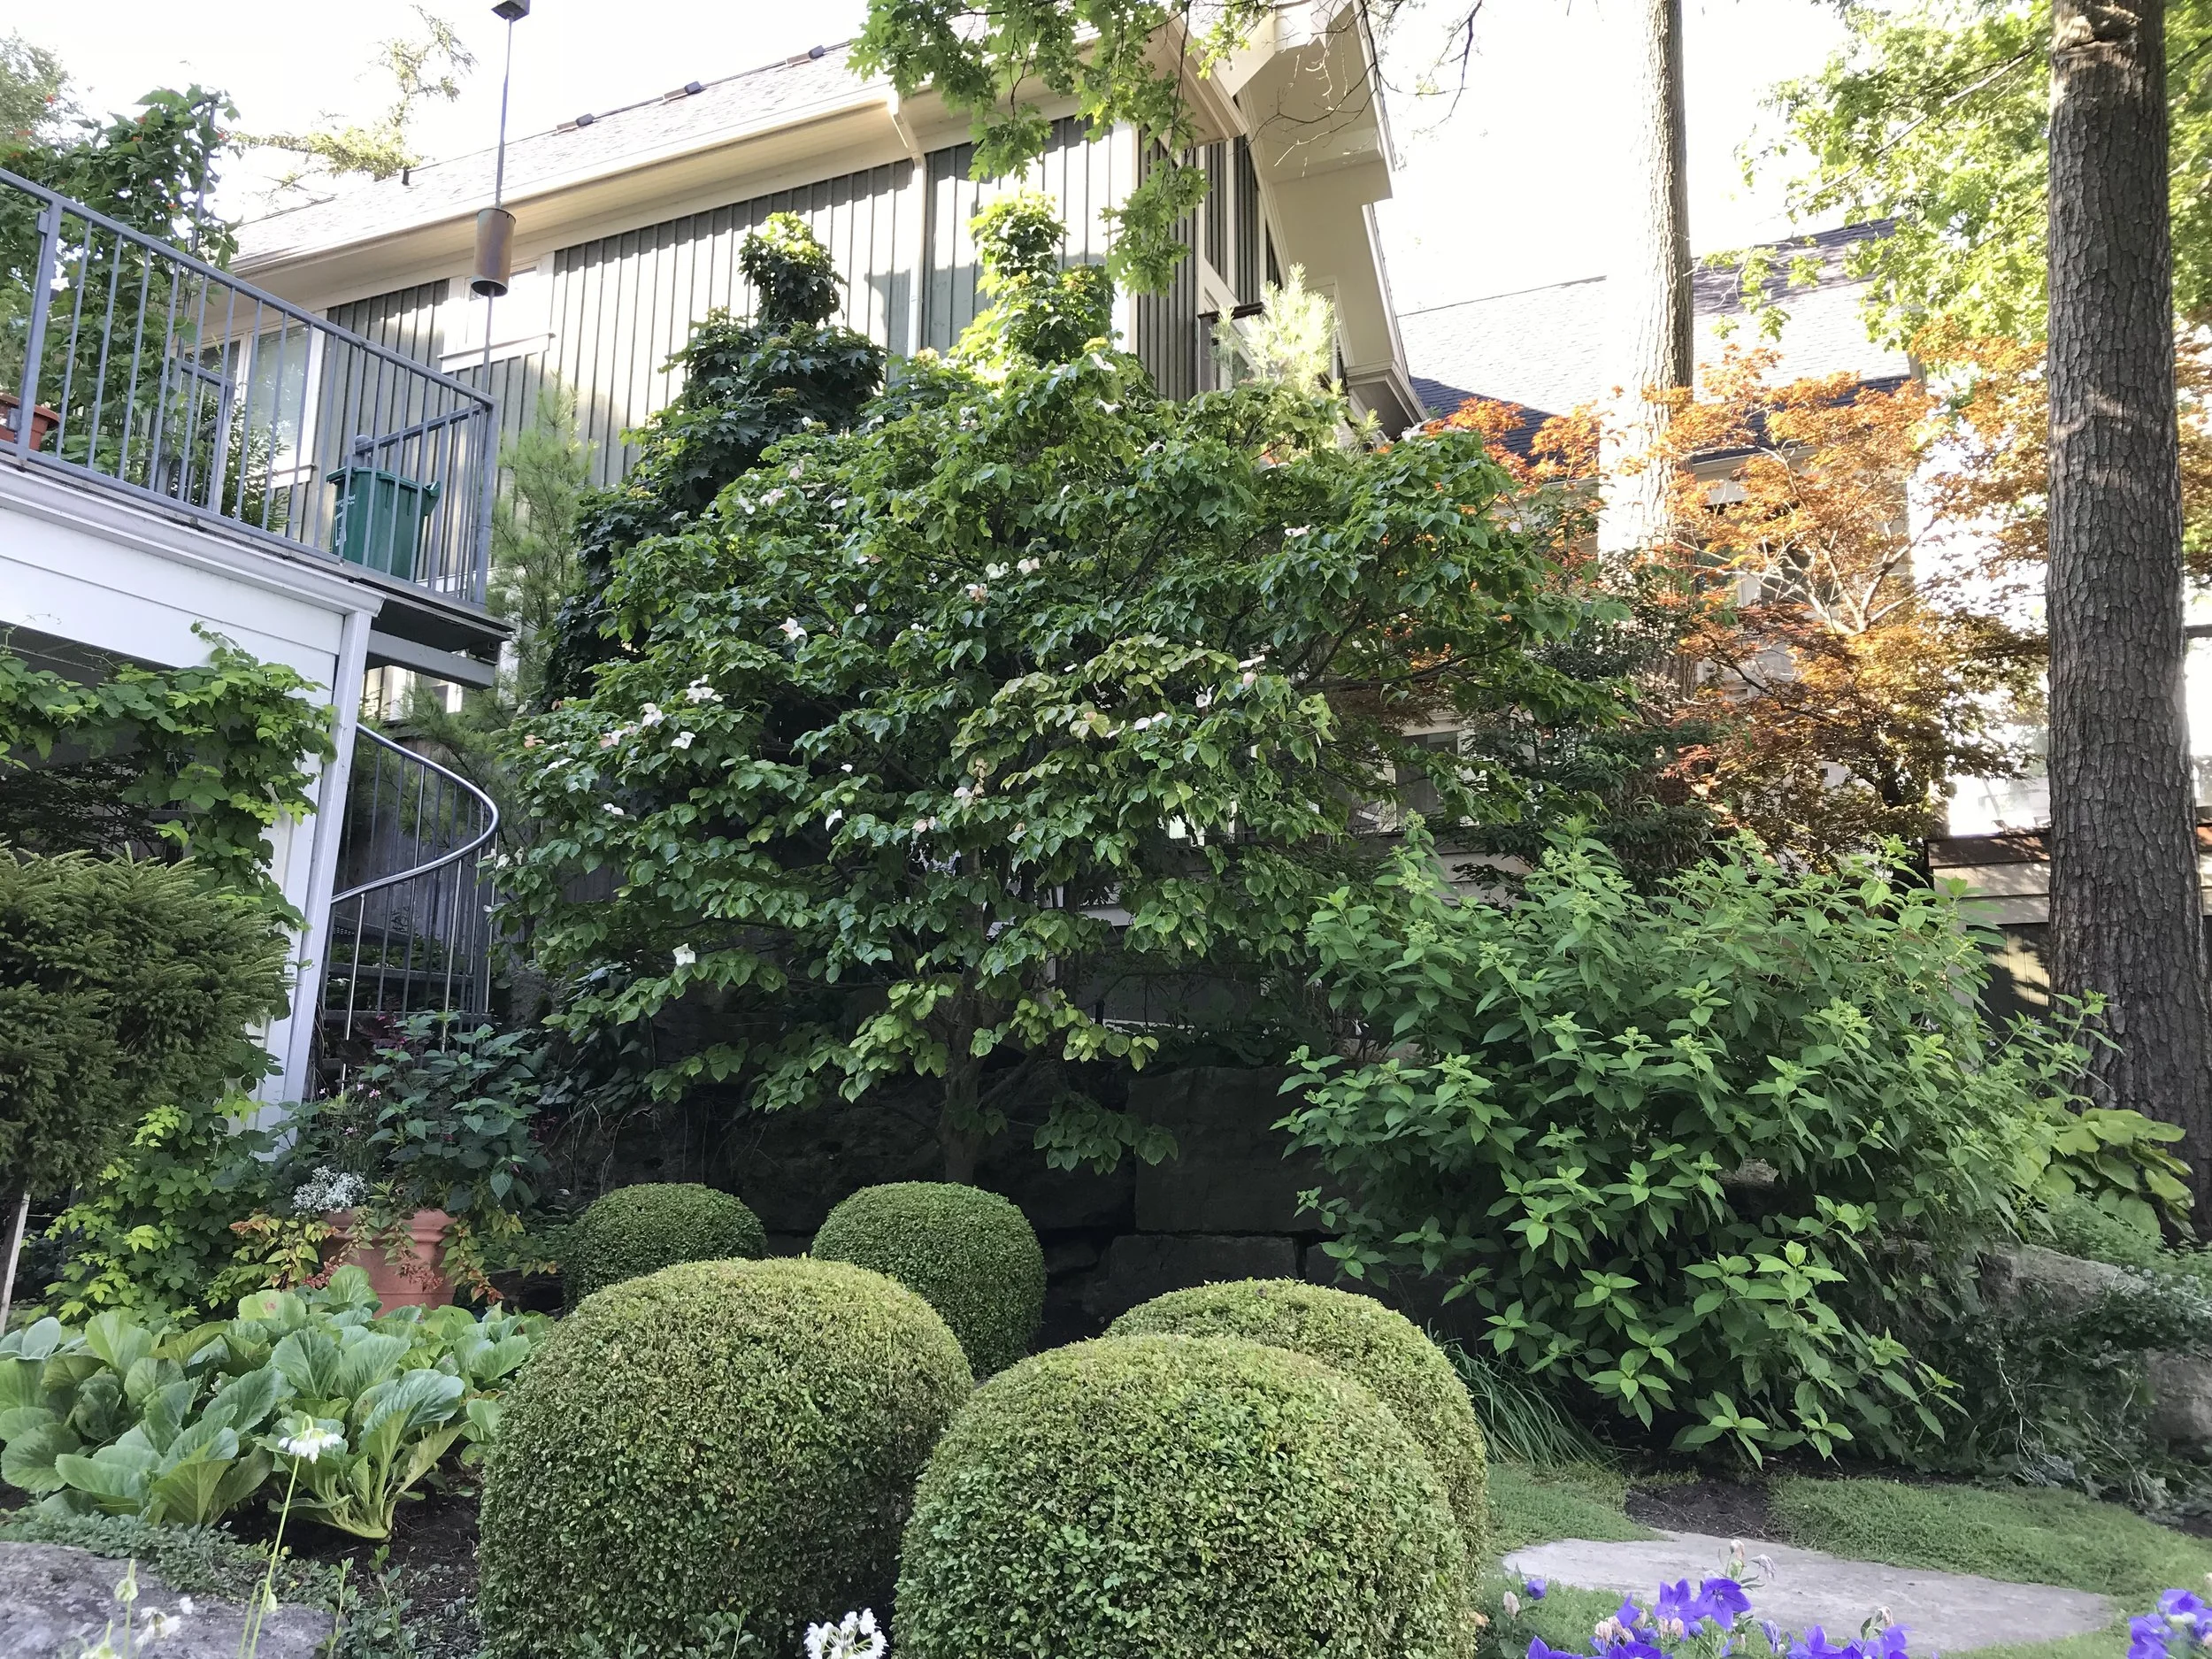
Hedge shears: great for things like boxwood spheres… but not for the other flowering shrubs in the garden (such as the Hydrangea paniculata or Cornus kousa growing in the background).

OK- back to natural shapes…

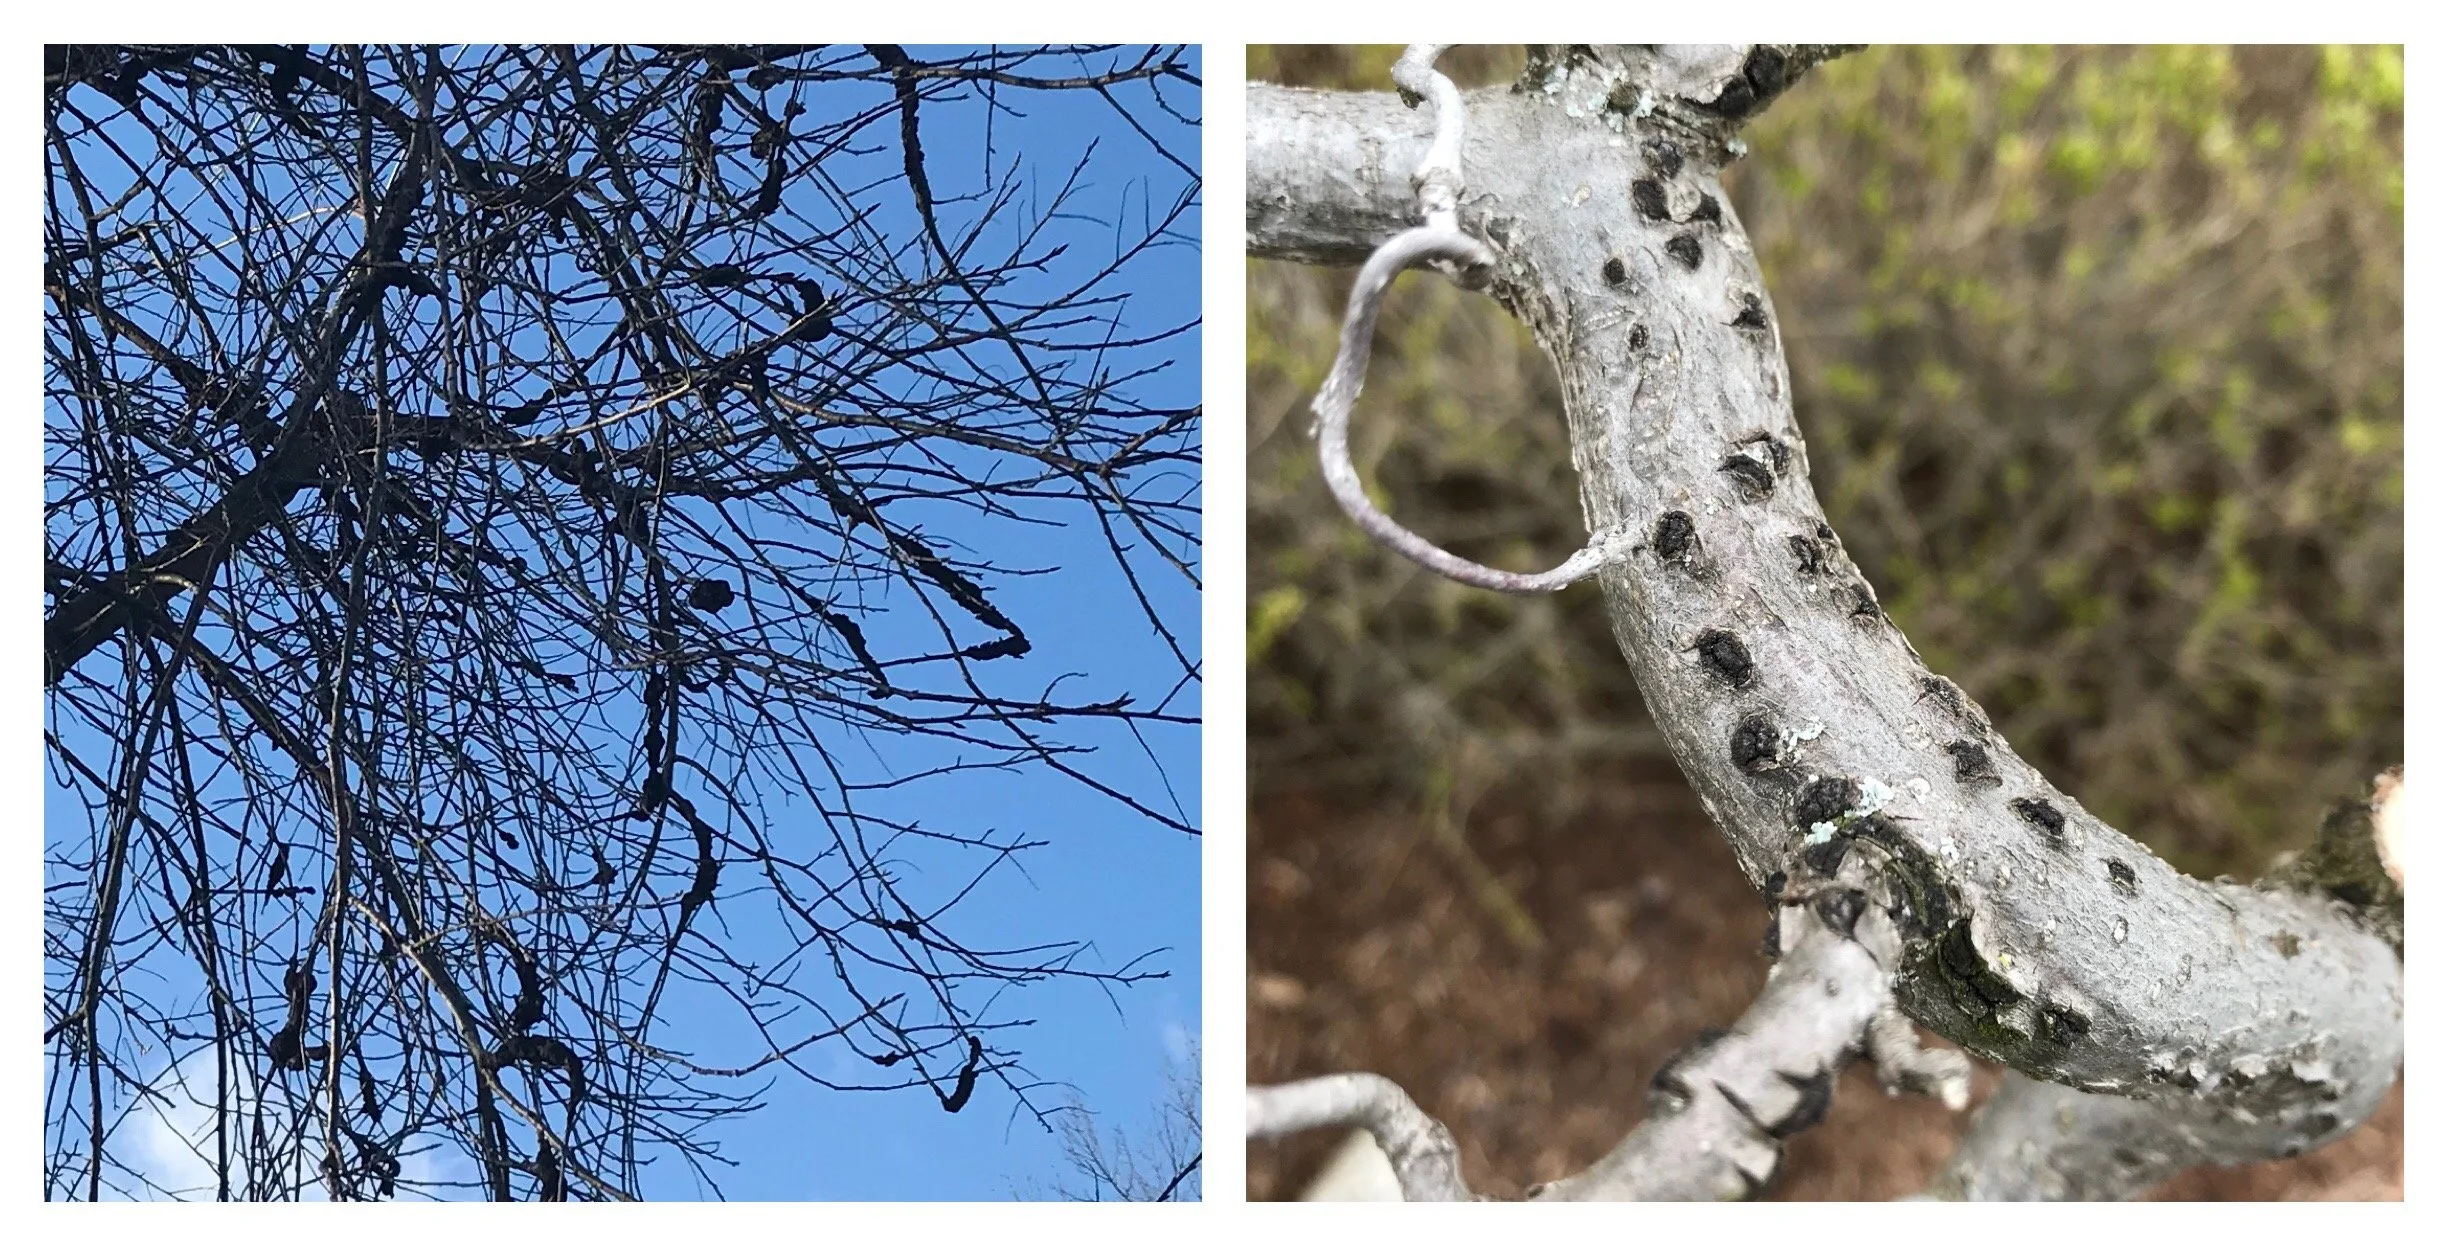
Let’s use a kousa dogwood (Cornus kousa) as an example. This is a shrub known for it’s architecturally stunning horizontal branching structure. Here are two photos- the first on the left showing the natural form of the tree, and the second (on the right) that has fallen victim to the hedge shears.

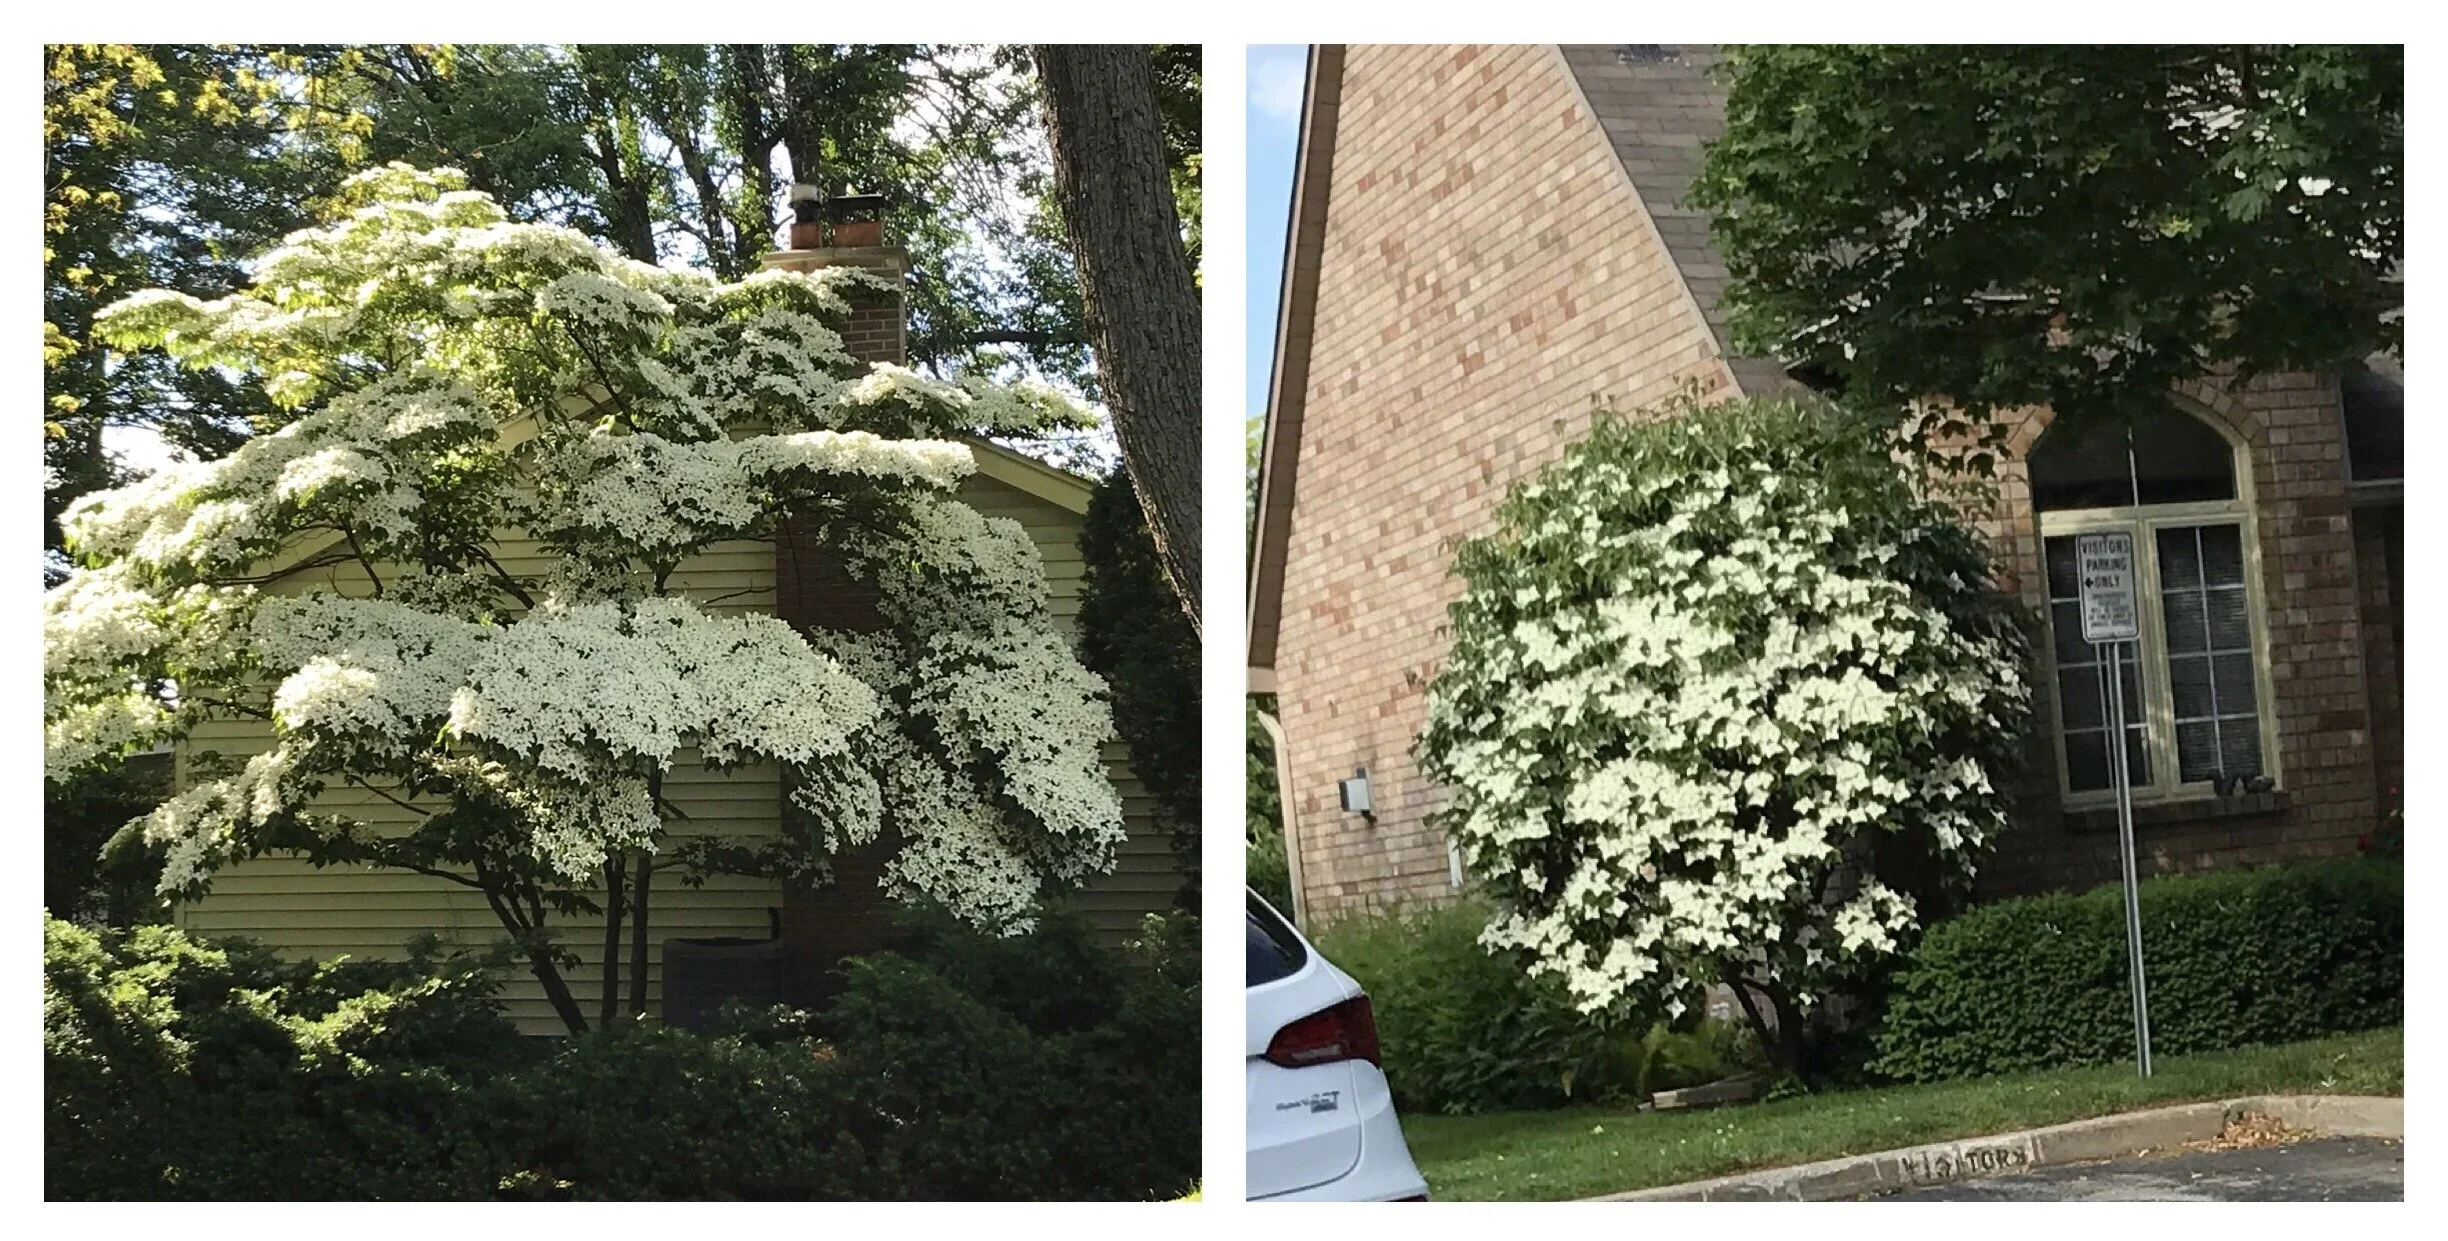
Poor dogwood! This type of disfigurement is completely avoidable with a little knowledge of how trees and shrubs grow and respond to pruning.

The Effect of Pruning

Let’s backtrack just for a second and take a look at what pruning actually does to a plant. When a pruning cut is made, it encourages the plant to grow from the next available growing point behind the pruning cut which is either:

  1. A bud or set of buds

  2. Existing branches

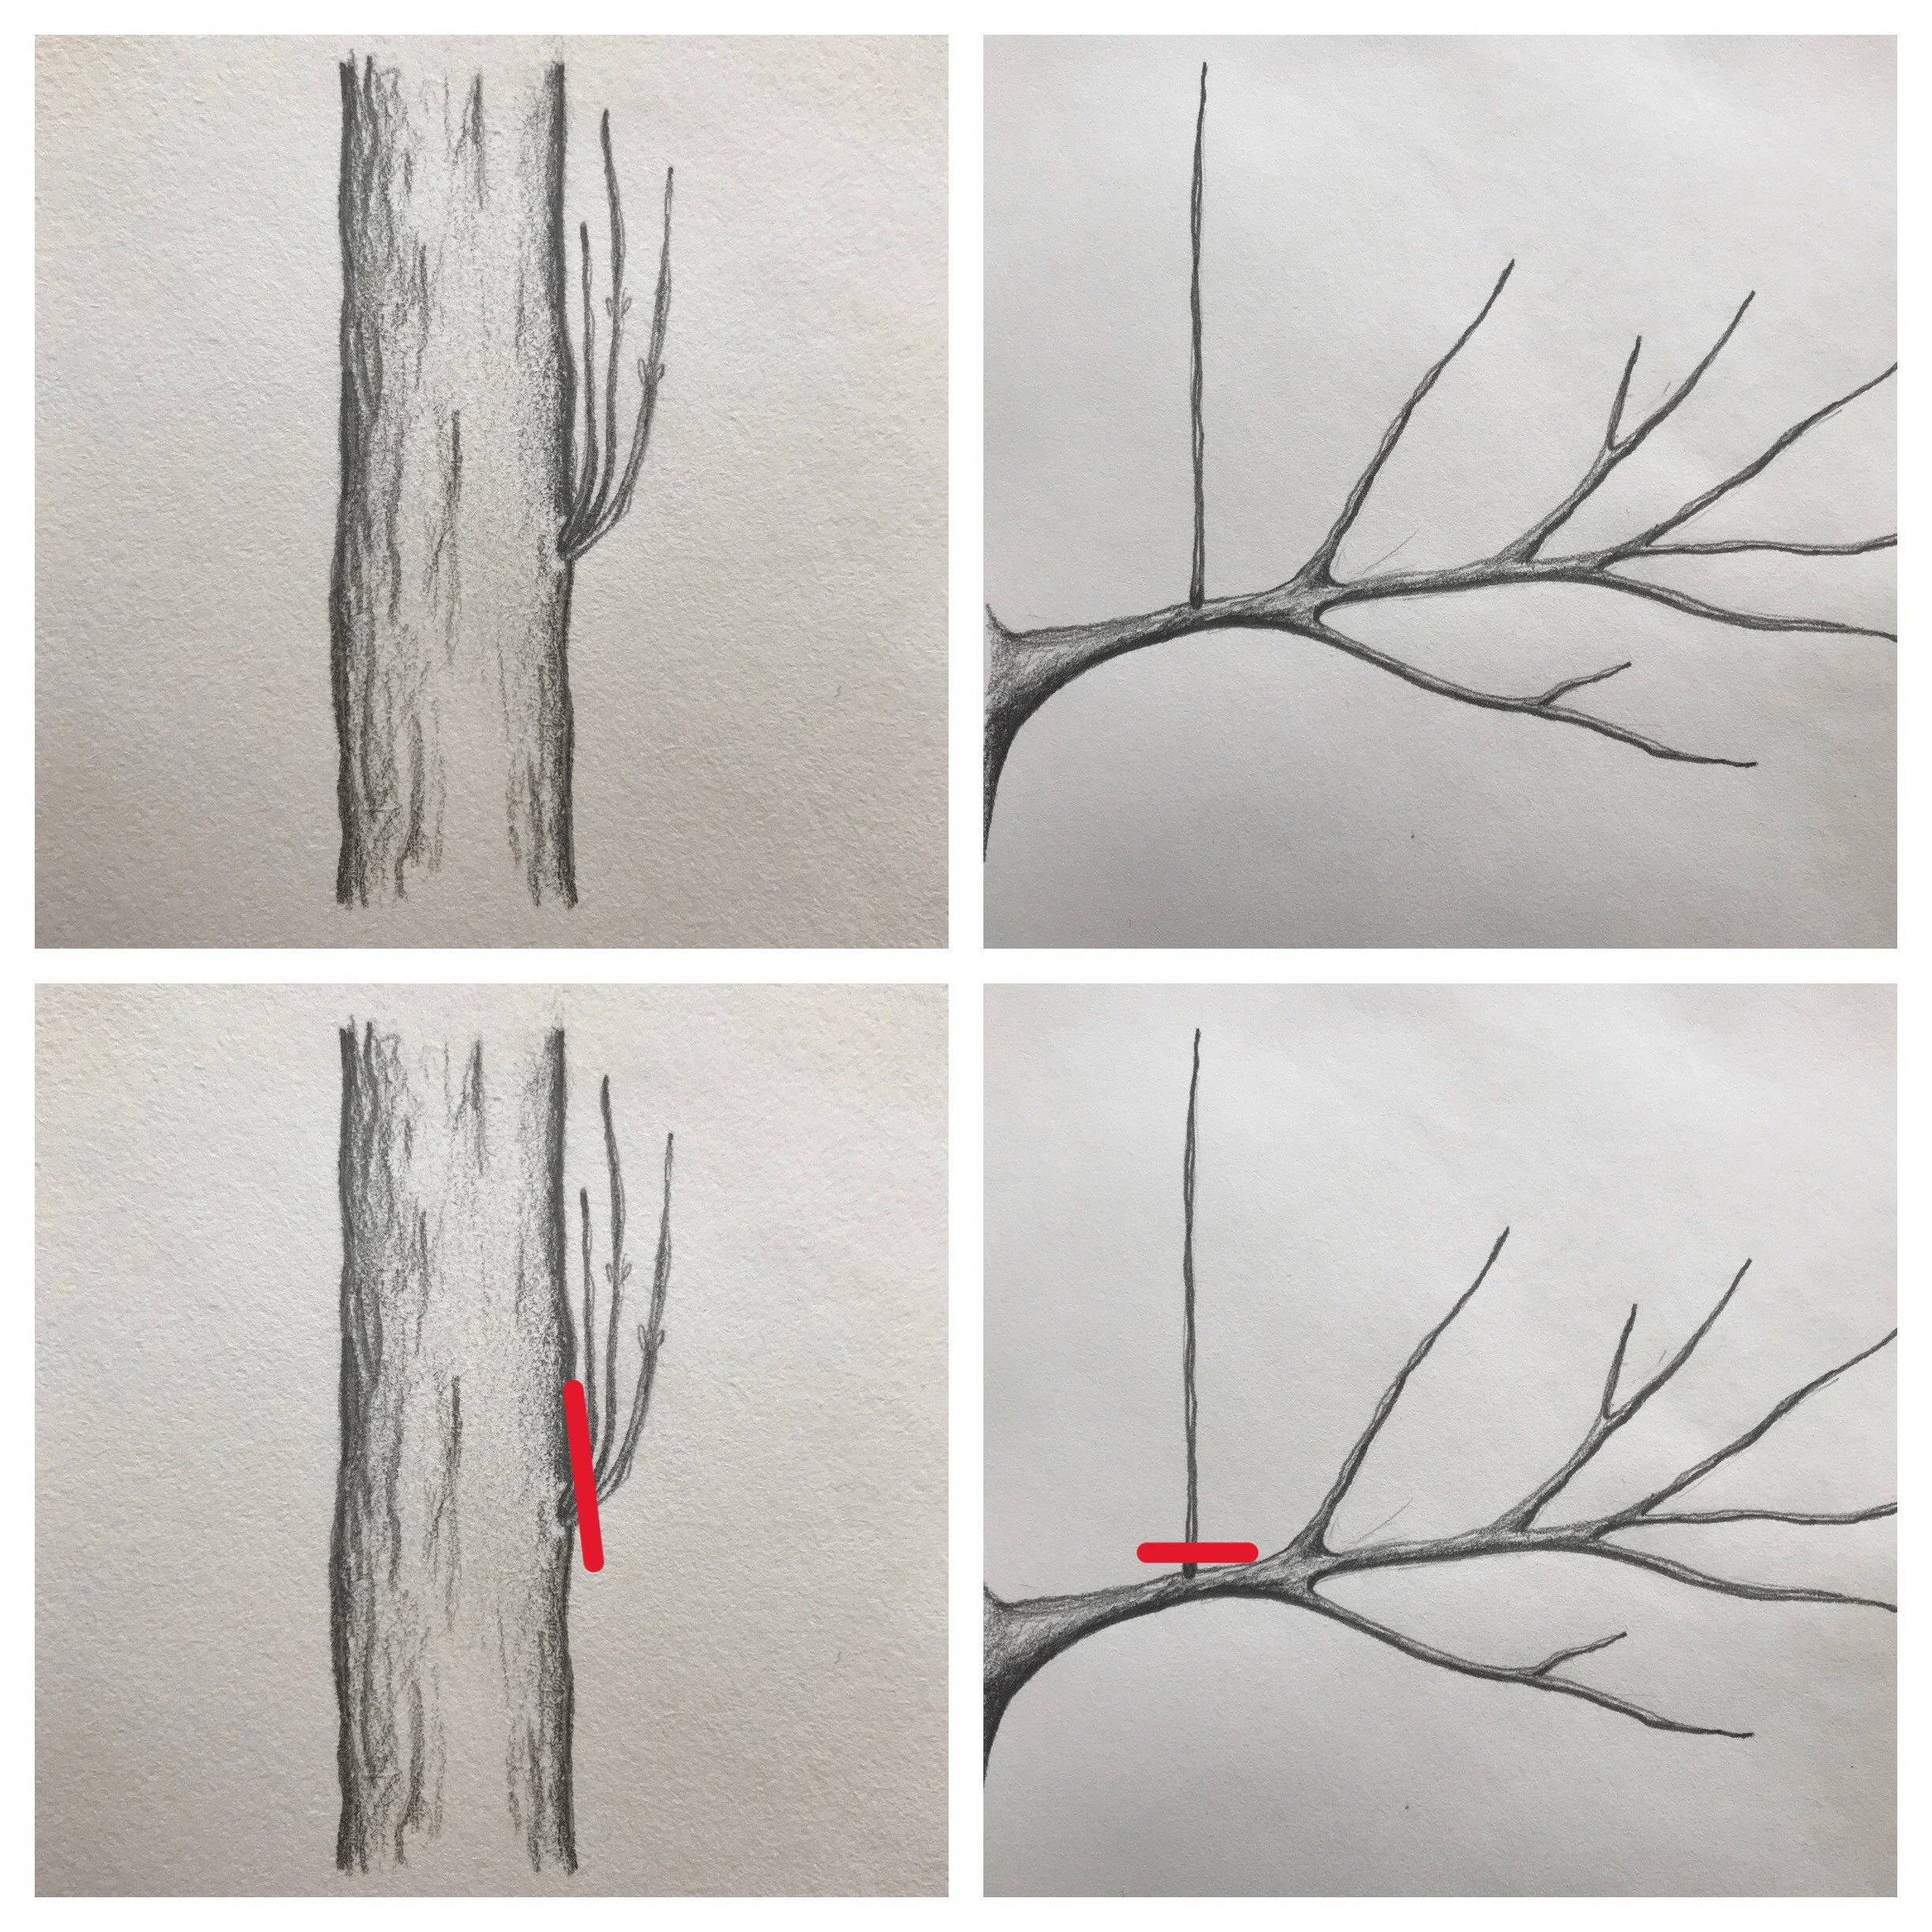
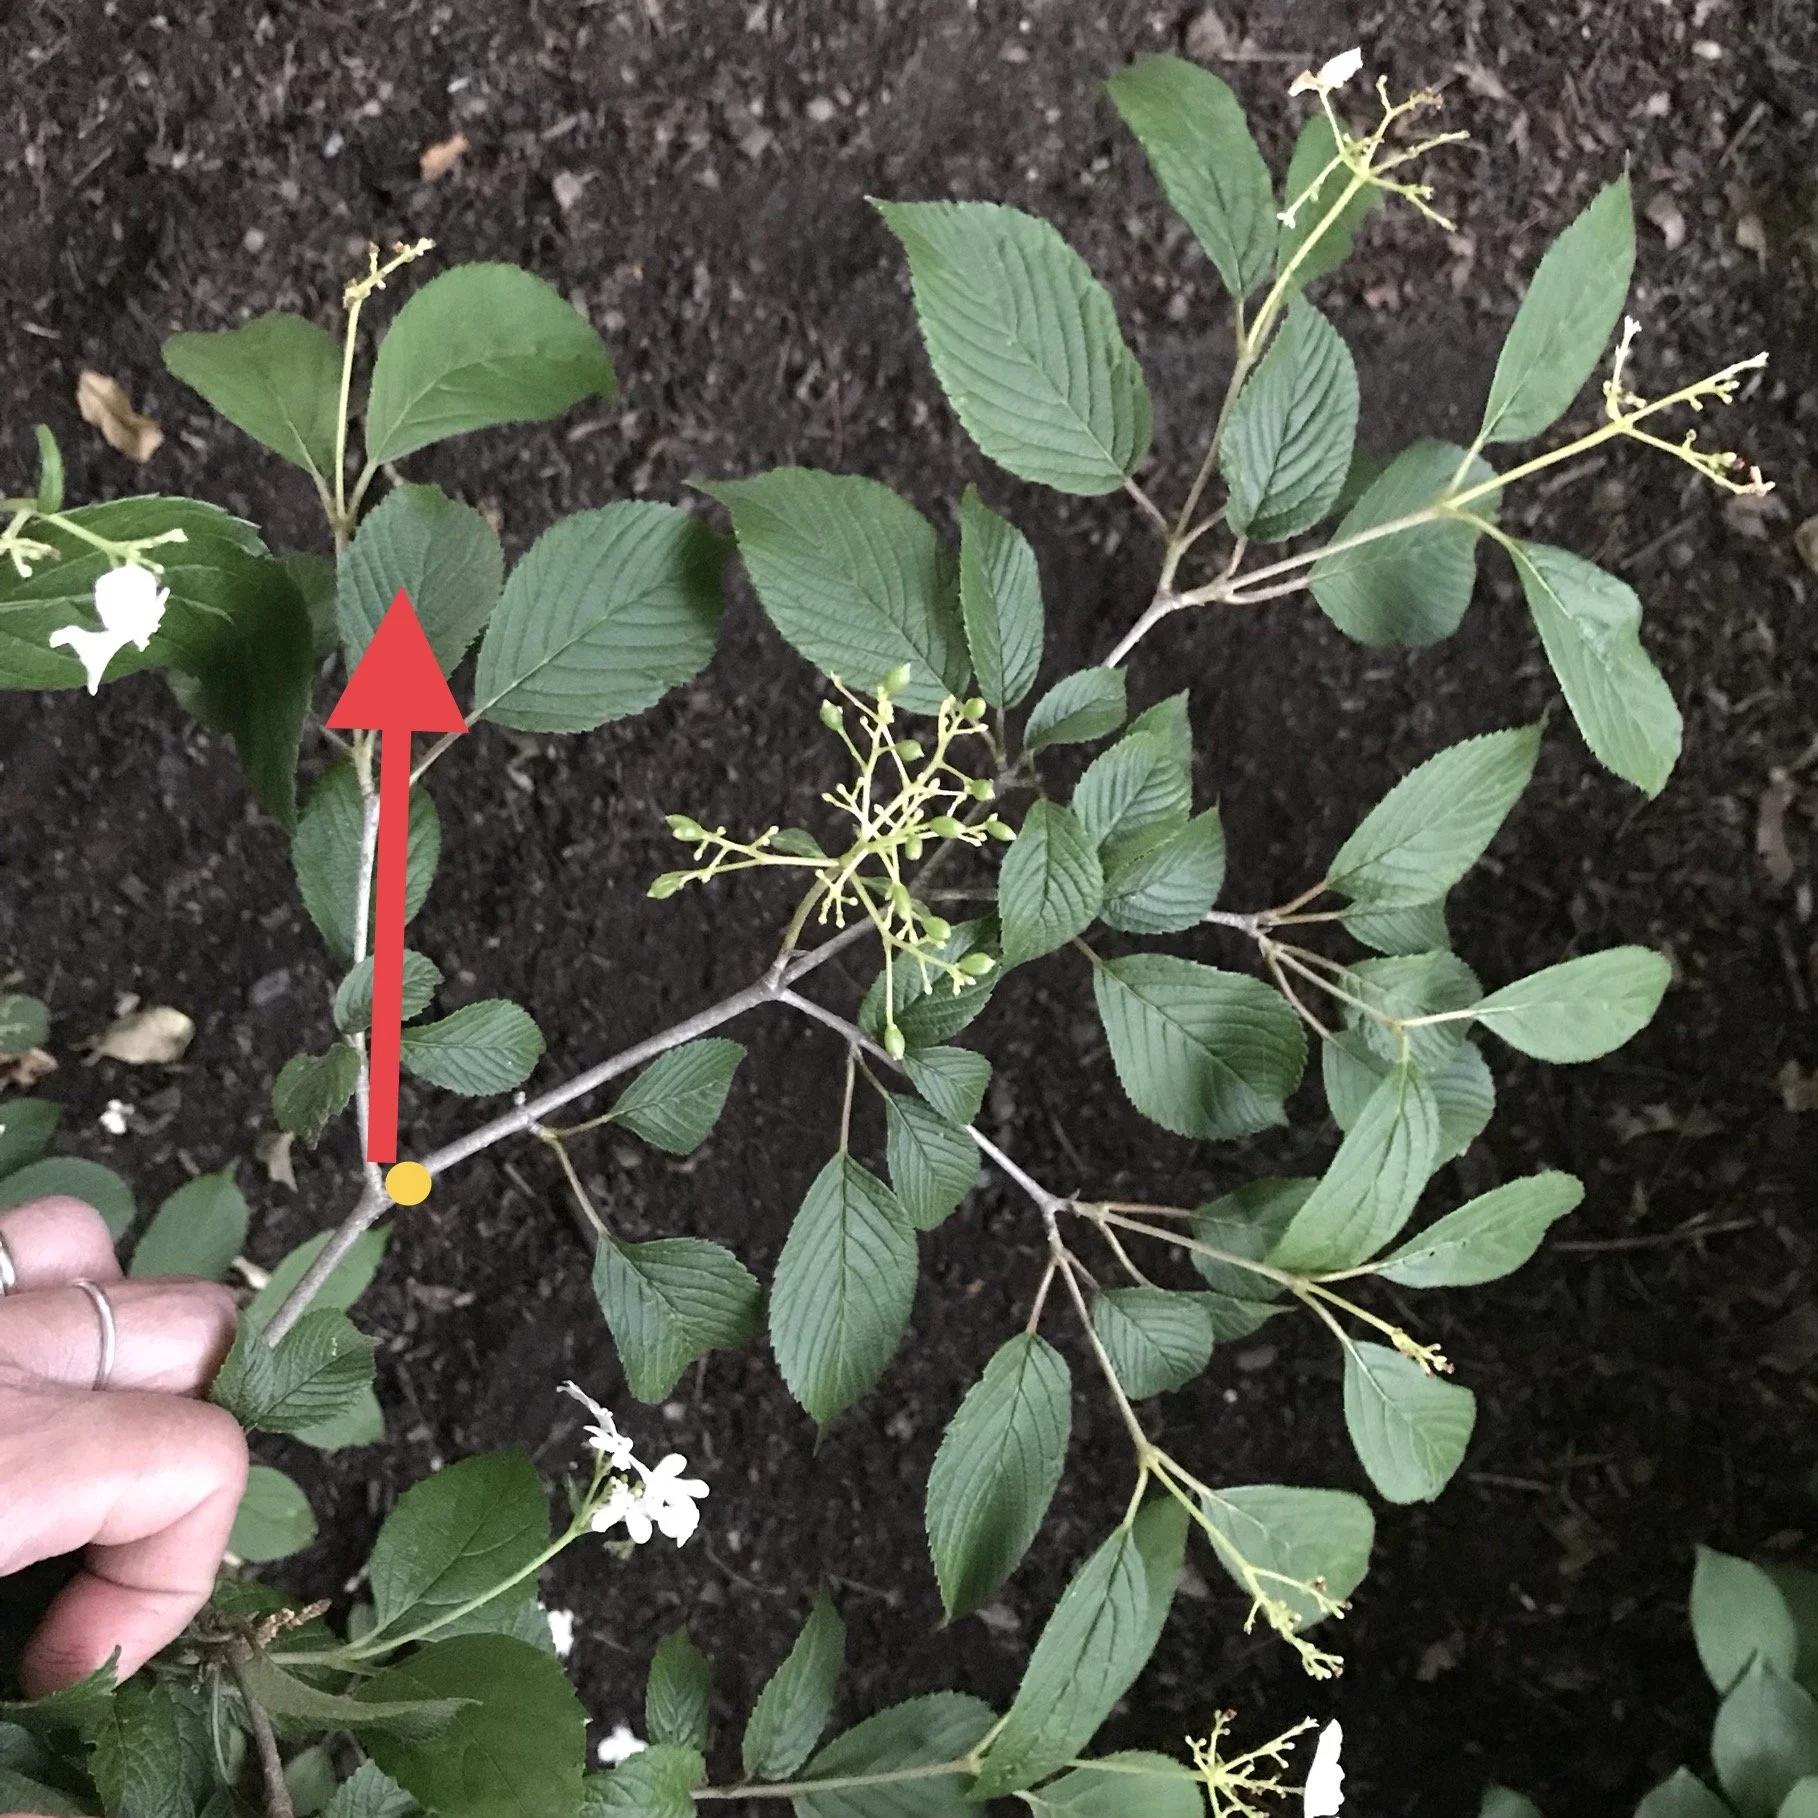
If a branch has been pruned back to a bud/buds, this is known as a ‘heading-back’ cut. The bud(s) are essentially forced to grow (in the direction in which they are pointing) and the pruning has ultimately promoted branching at the point of pruning.

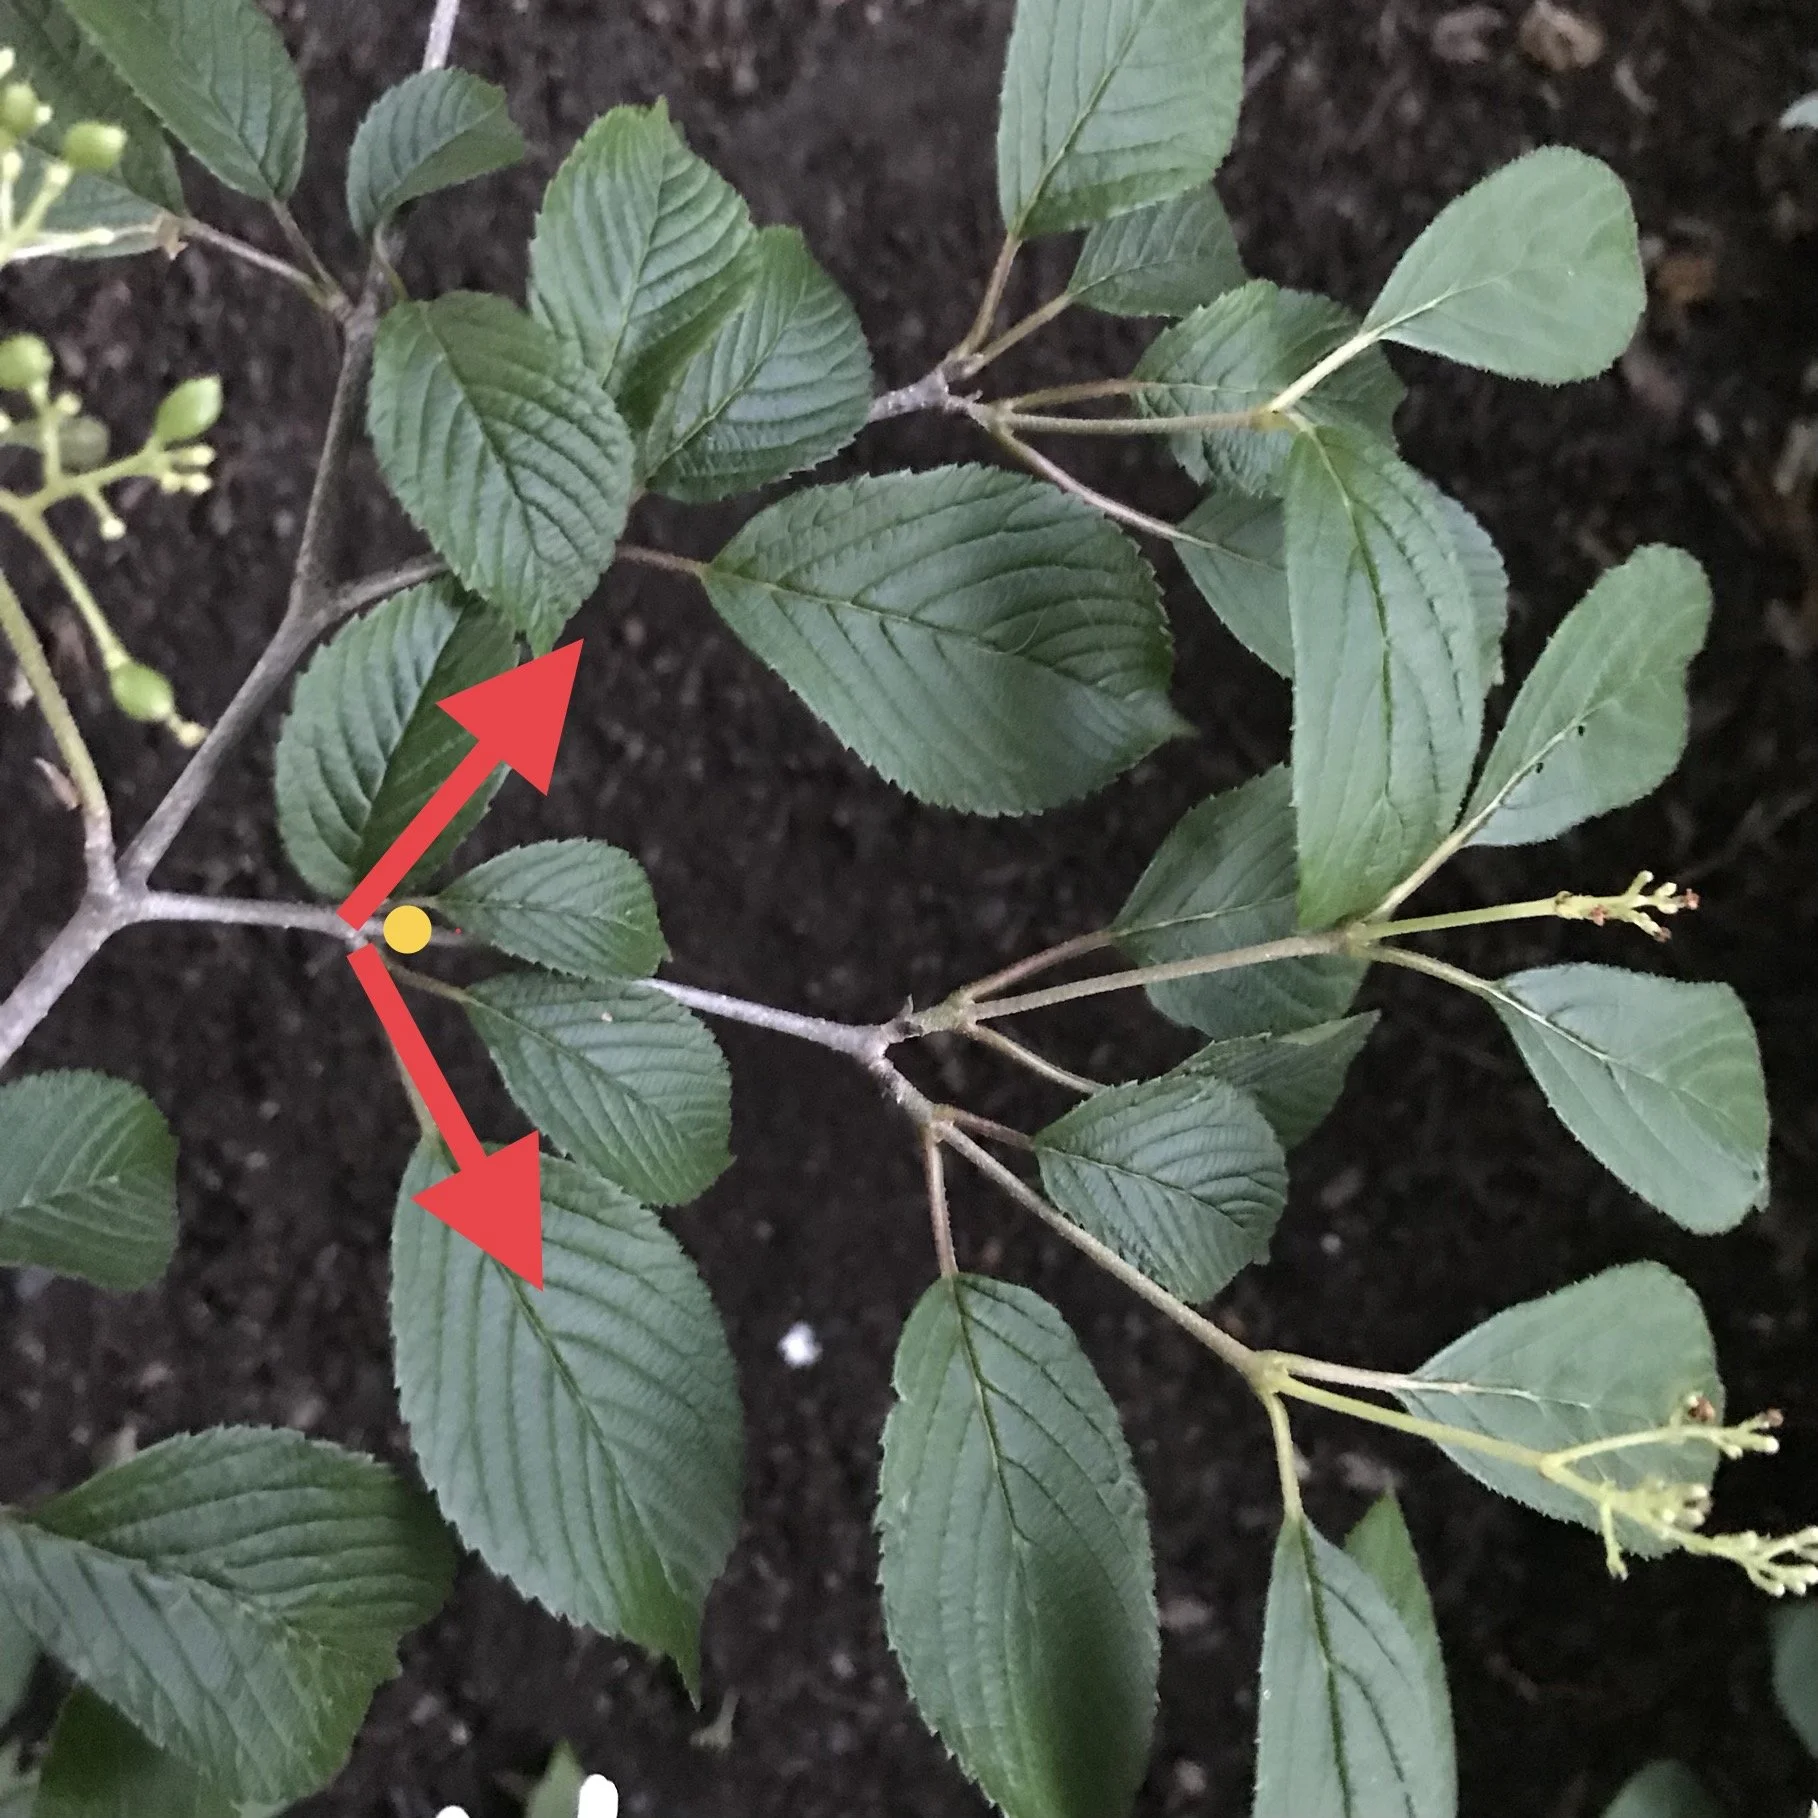
Pruning back to a bud (a ‘heading back’ cut). The yellow dot indicates the pruning point and the red arrows illustrate the direction of resultant growth.

When a plant is routinely sheared (or just the tips of branches are snipped off to control size), the constant growth from buds and resultant new branches ultimately leads to a tree or shrub with really dense growth and branching on the outer edges and bare stems within the centre of the plant- not exactly a natural form!

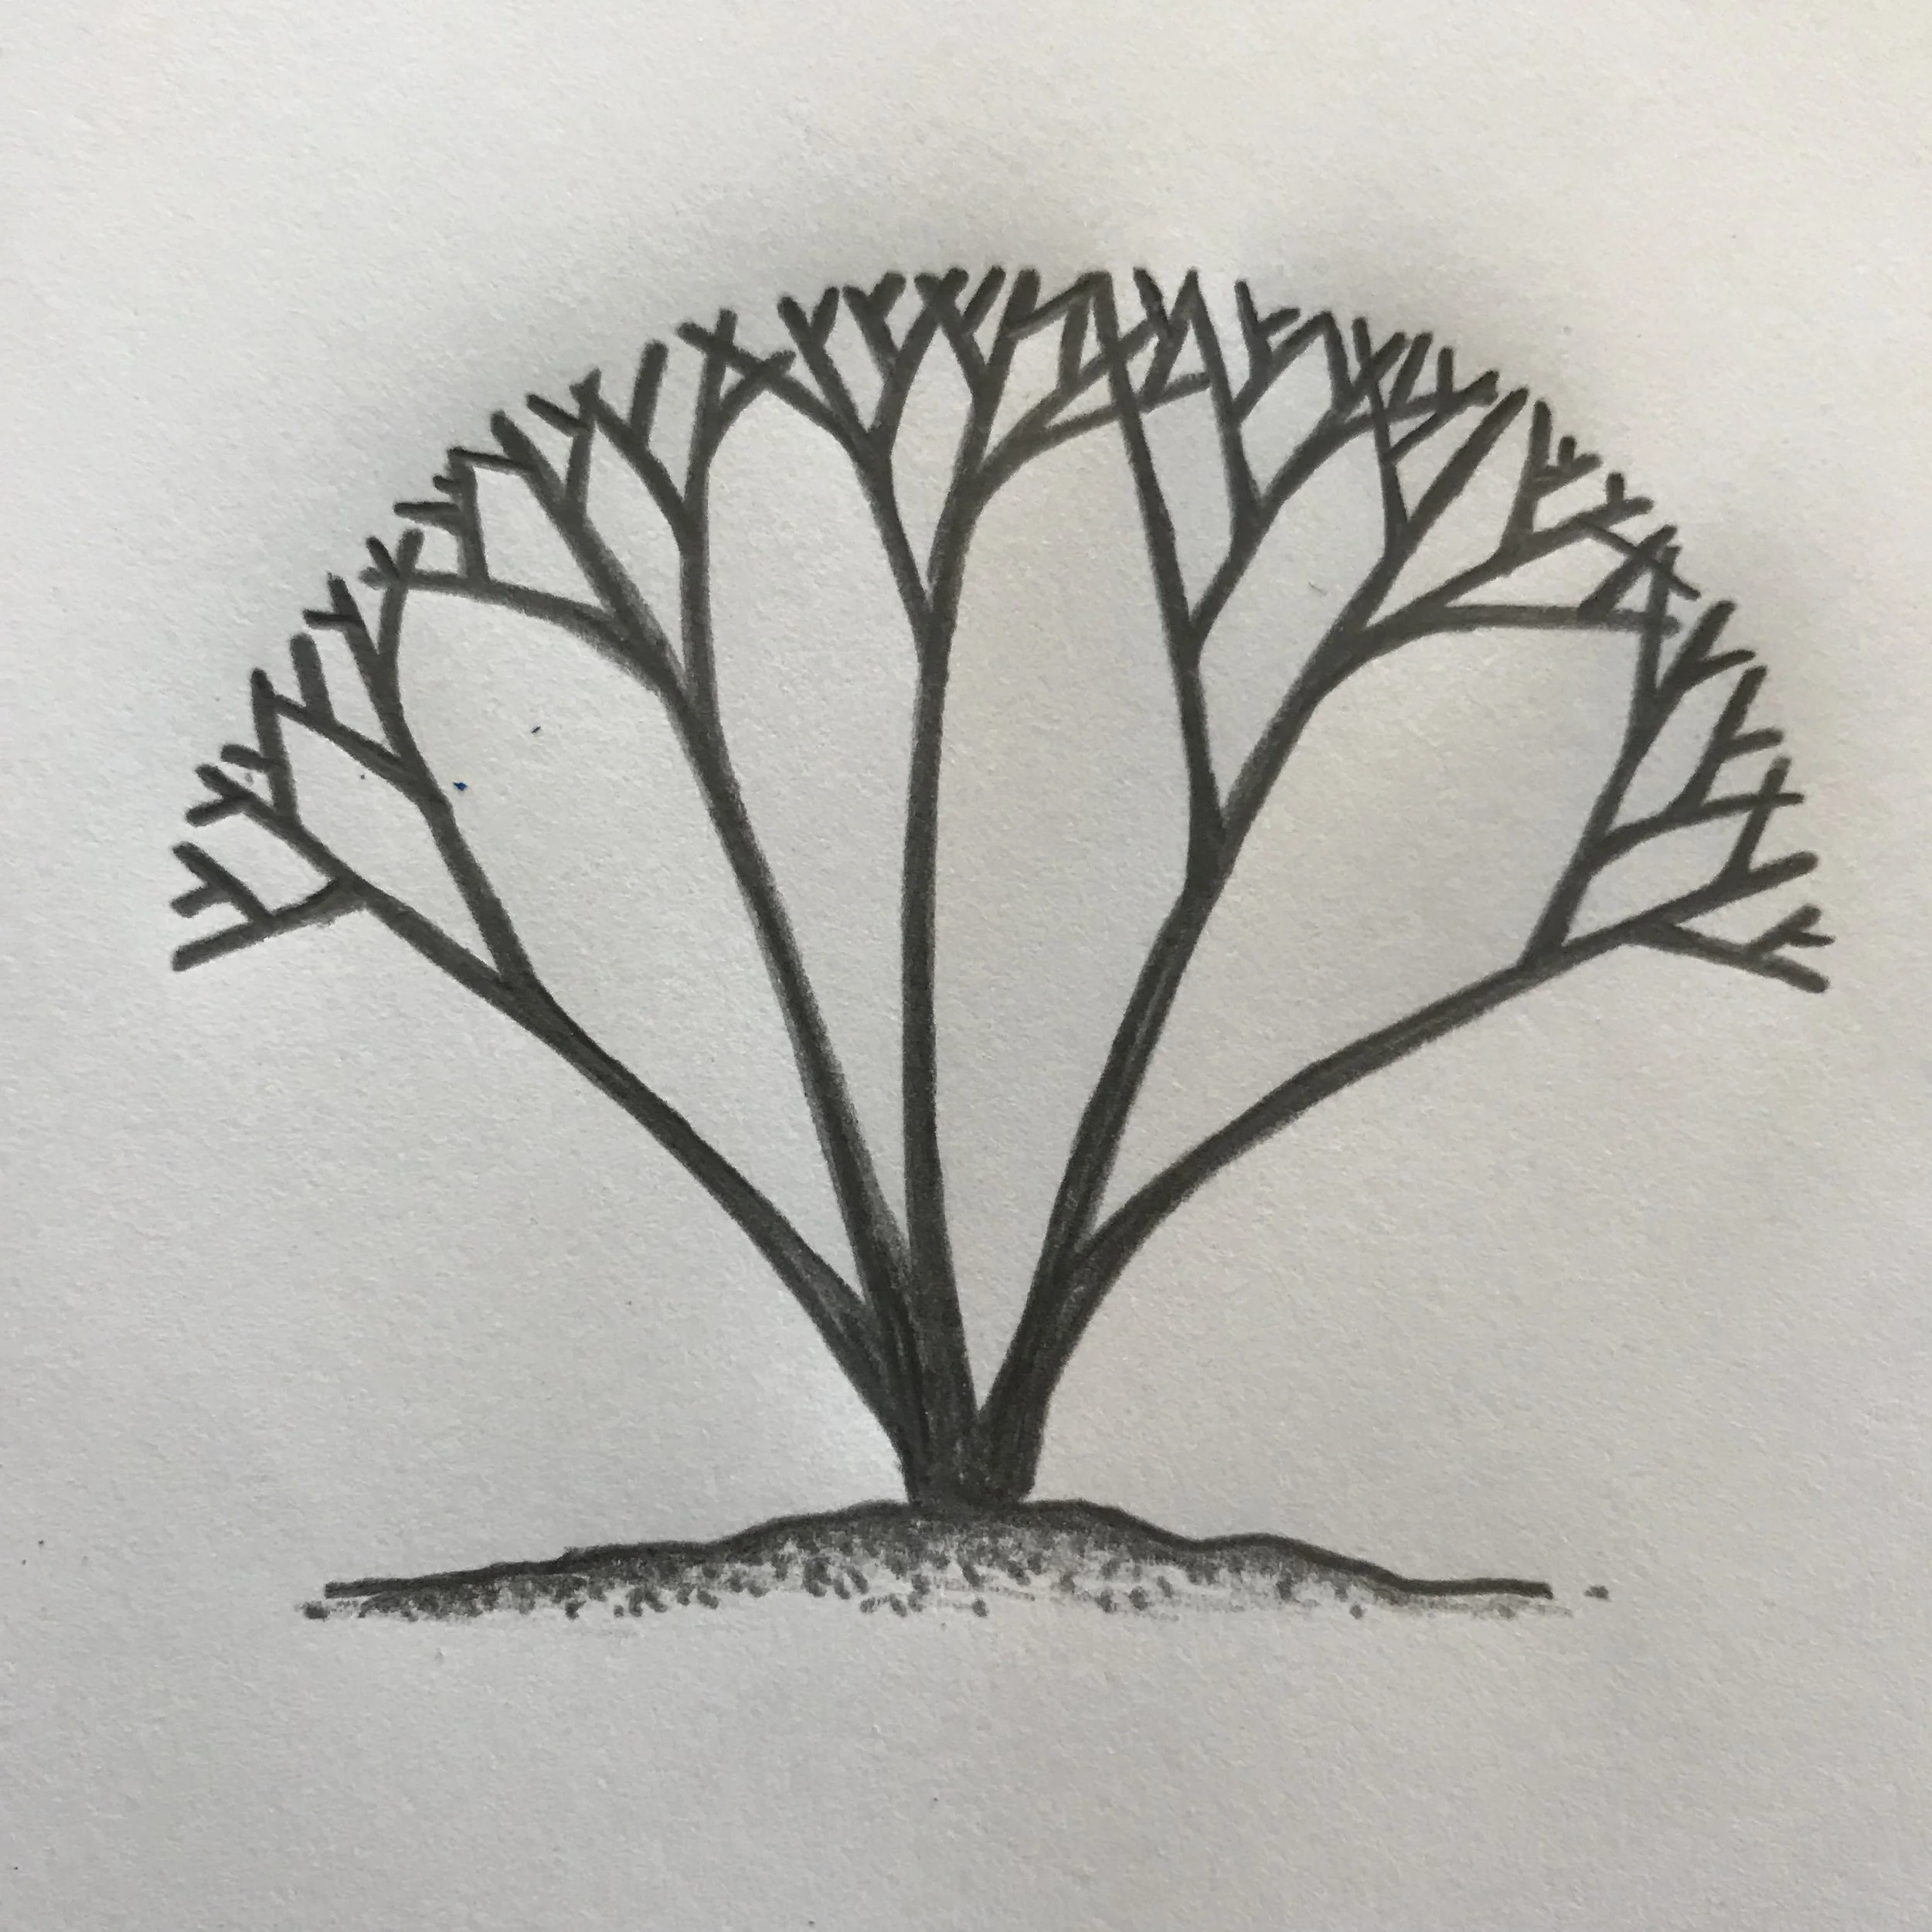
A basic schematic that shows how routine shearing leads to a shrub with very dense branching on the outer edges of the shrub and a sparse interior.

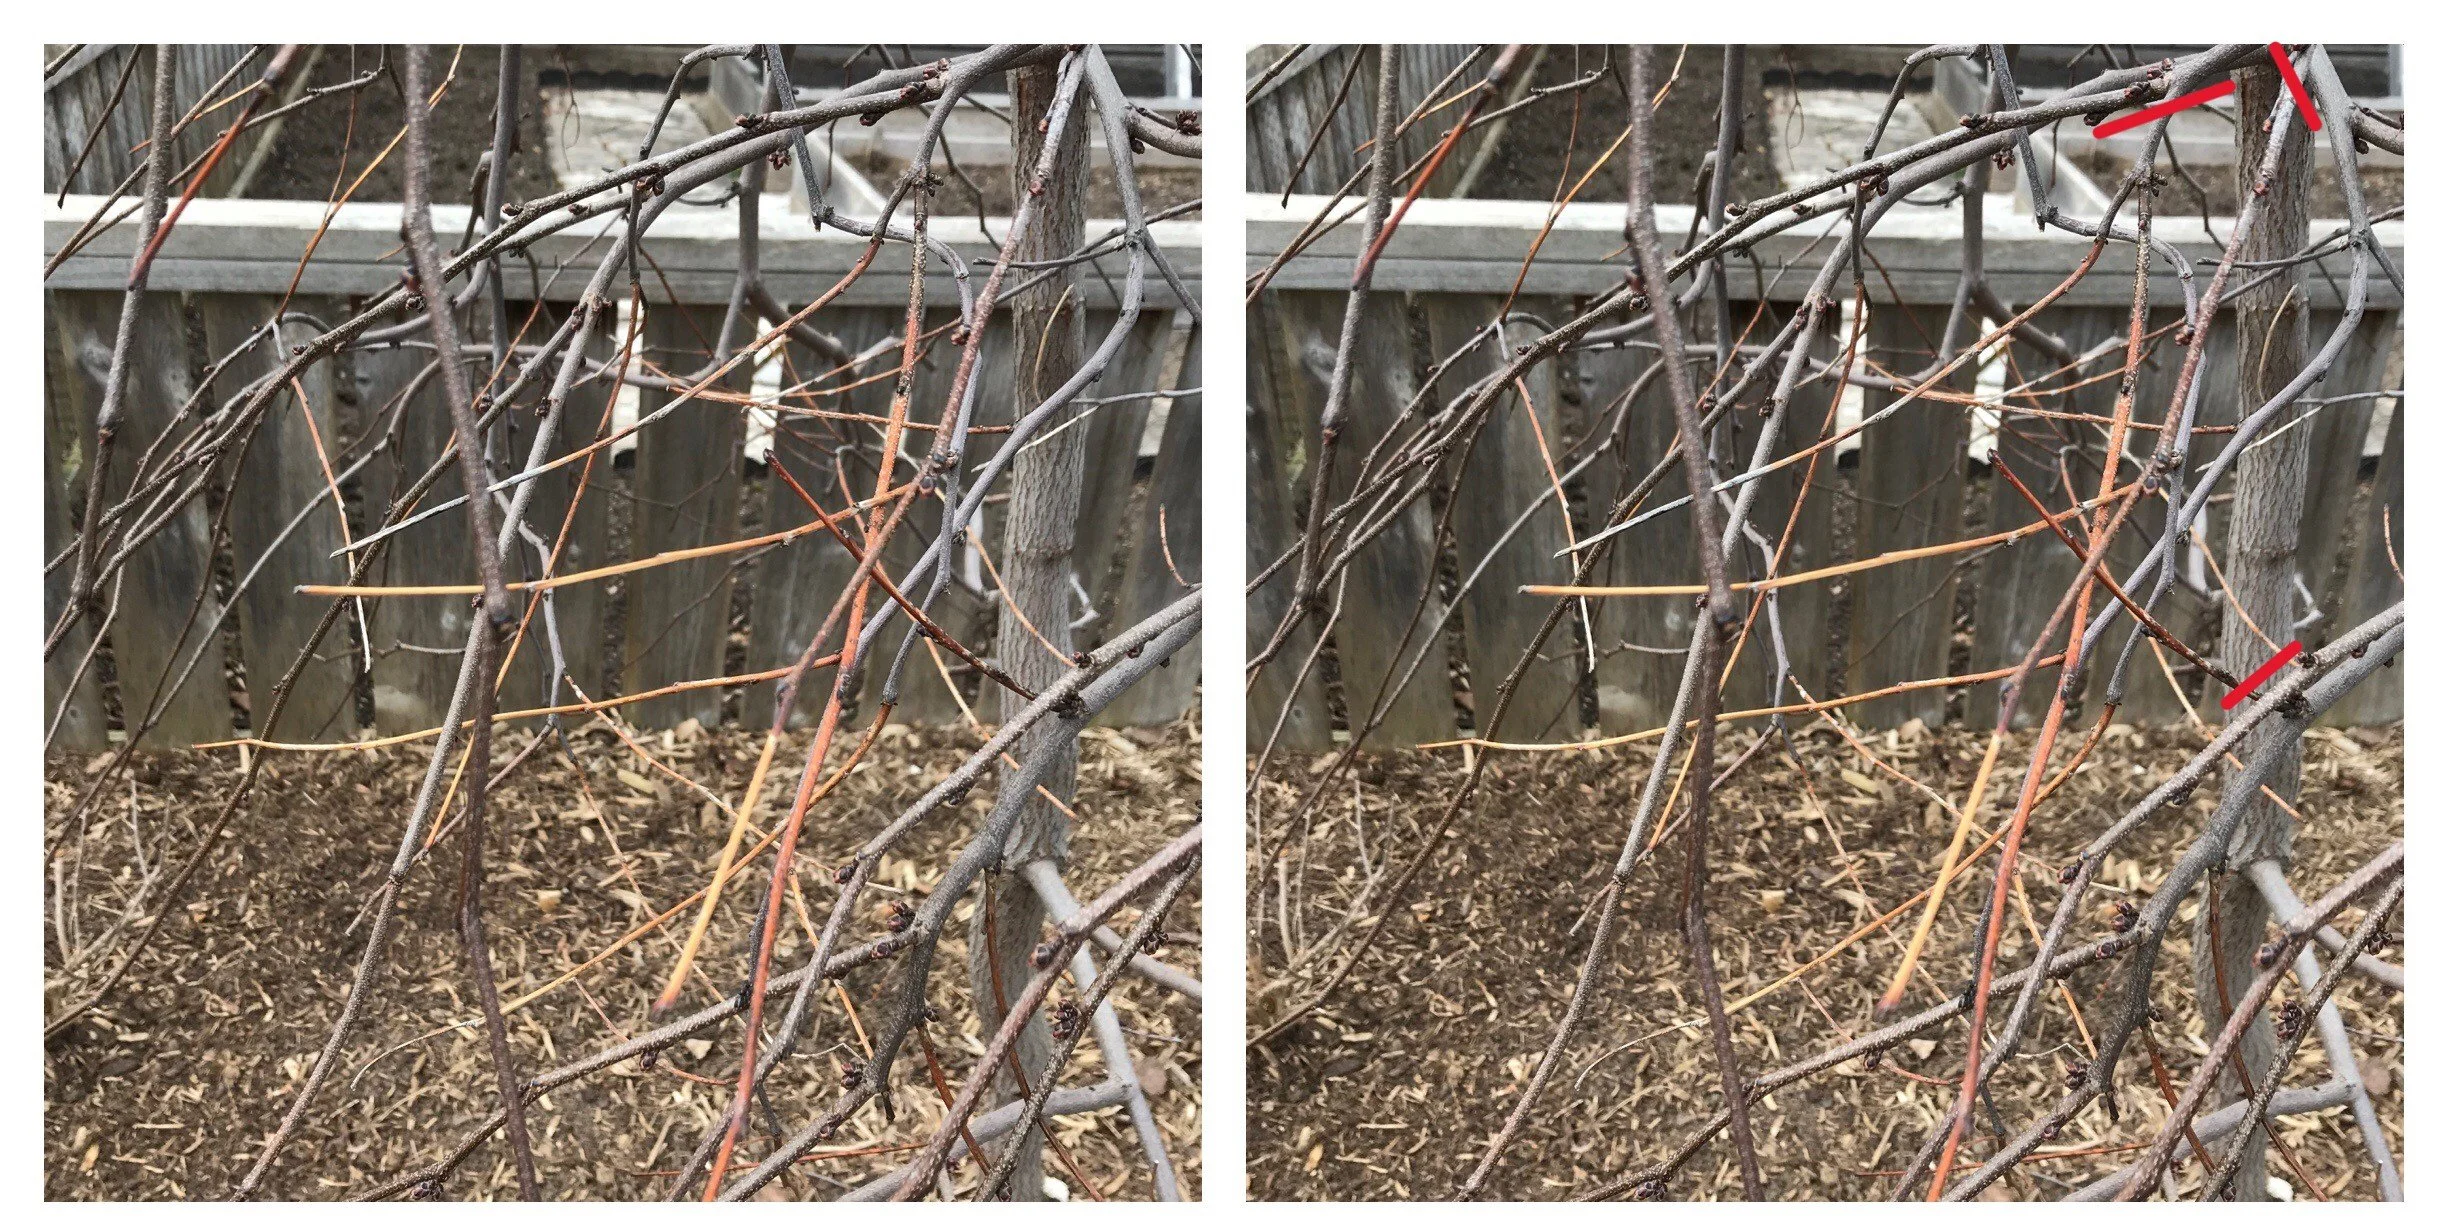
On the contrary, when a branch is pruned back to another branch (known as a ‘thinning cut’), the plant will essentially direct it’s growth toward that remaining branch.

A ‘thinning cut’ back to a lateral branch (indicated by the yellow dot) and the resultant growth directed toward the remaining branch (as indicated by the red arrow).

It is these thinning cuts that are the key to what I like to call ‘the natural prune’. Here is how it is done…

The trick is to visualize a ‘shrub within the shrub’. Usually I get blank looks when I use this line- but it is the best way to describe the process. Essentially, you want the shrub to have the exact same branching structure after the pruning job is complete as it did before you took the secateurs to it, yet the overall size is scaled back.

Perhaps the idea of pruning sounds even more daunting than before? Have no fear! Let’s walk through this together.

I generally follow three steps when doing a ‘natural prune’ on trees and shrubs:

  1. Identify a long branch

  2. Trace this branch back to where it connects with a secondary (lateral) branch somewhere within the shrub

  3. Prune the long branch close to it’s union with the lateral branch (usually a few millimeters away from the point of connection, with the pruning cut angled up toward the lateral branch)

  4. Continue this technique around the whole shrub, multiple rounds if necessary, to remove all the longest branches

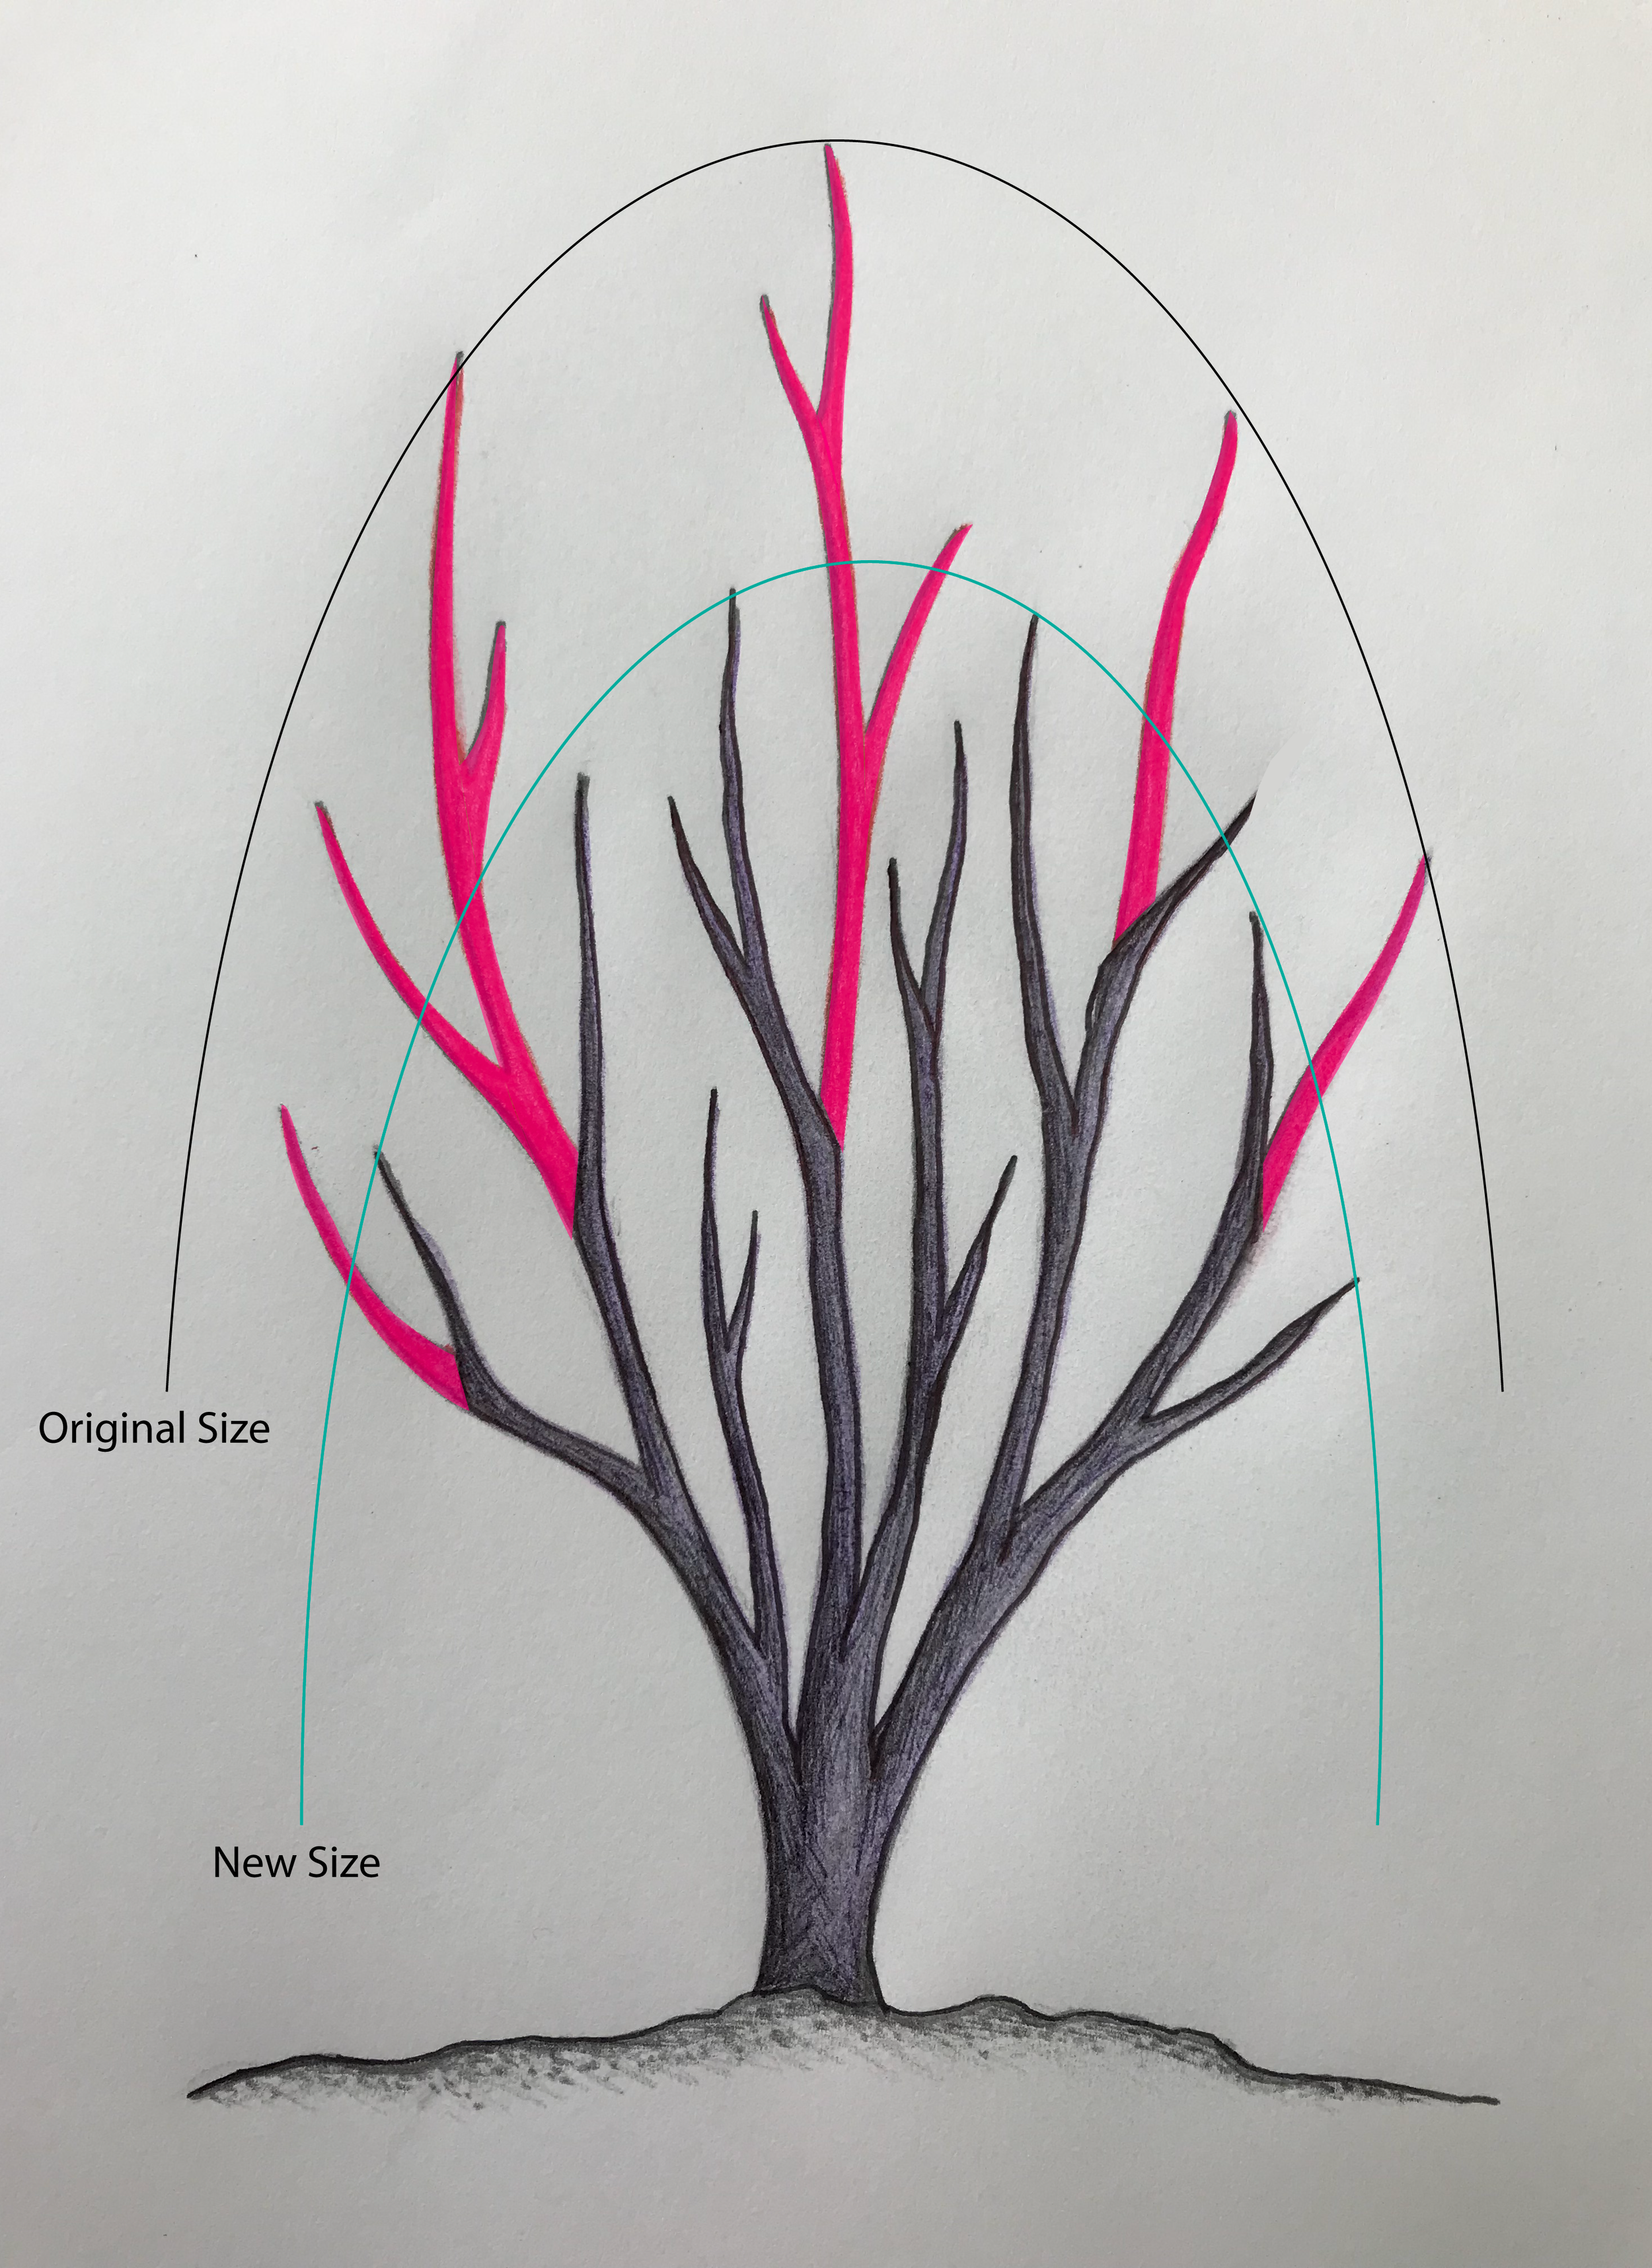
An overly simplified image of a shrub illustrating the use of ‘thinning cuts’ to reduce the overall size. The coral-coloured branches indicate the portions of the shrub to be removed, the rest of the shrub remains. Note that the overall height and size of the shrub has been reduced using this technique.

Using this technique:

  • with the longest branches removed, the shorter ones become the outermost branches and therefore the overall size of the plant has been reduced

  • the pruning cuts are hidden within the shrub so you won’t be looking at little stubs that scream “I’ve just been pruned!”

  • the form of the shorter branches remain untouched and therefore the natural form of the shrub remains in tact

  • The plant won’t be forced to branch out from buds along the pruned stem because, by pruning to a secondary branch, the tree/shrub has essentially been told to direct it’s energy toward growing that secondary branch

Simple!

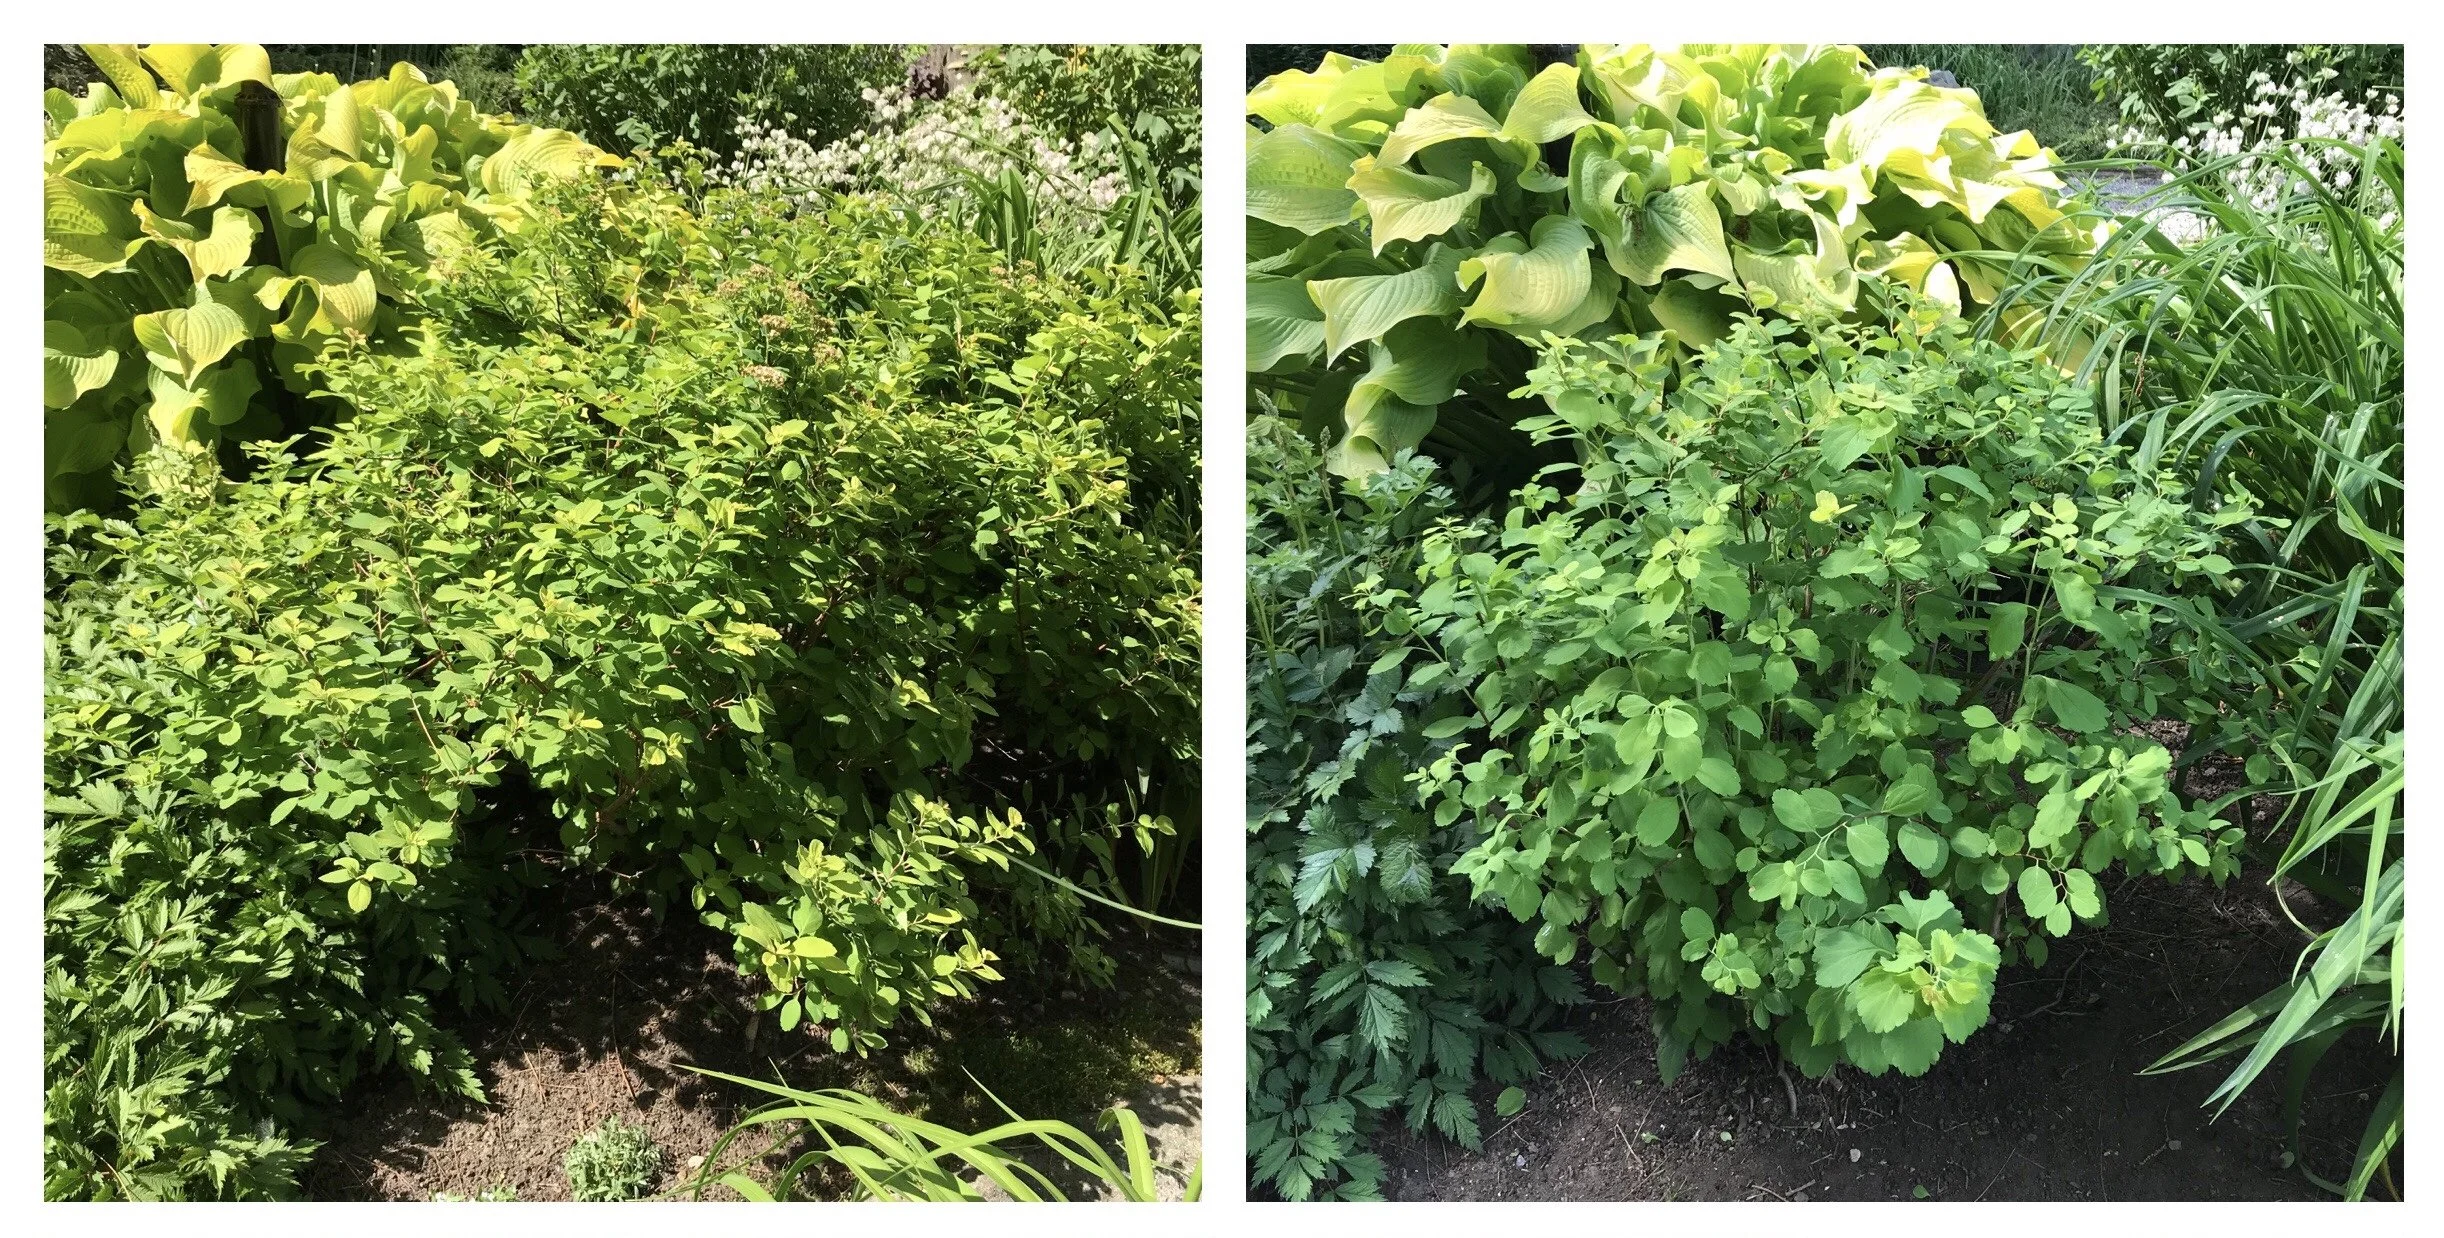
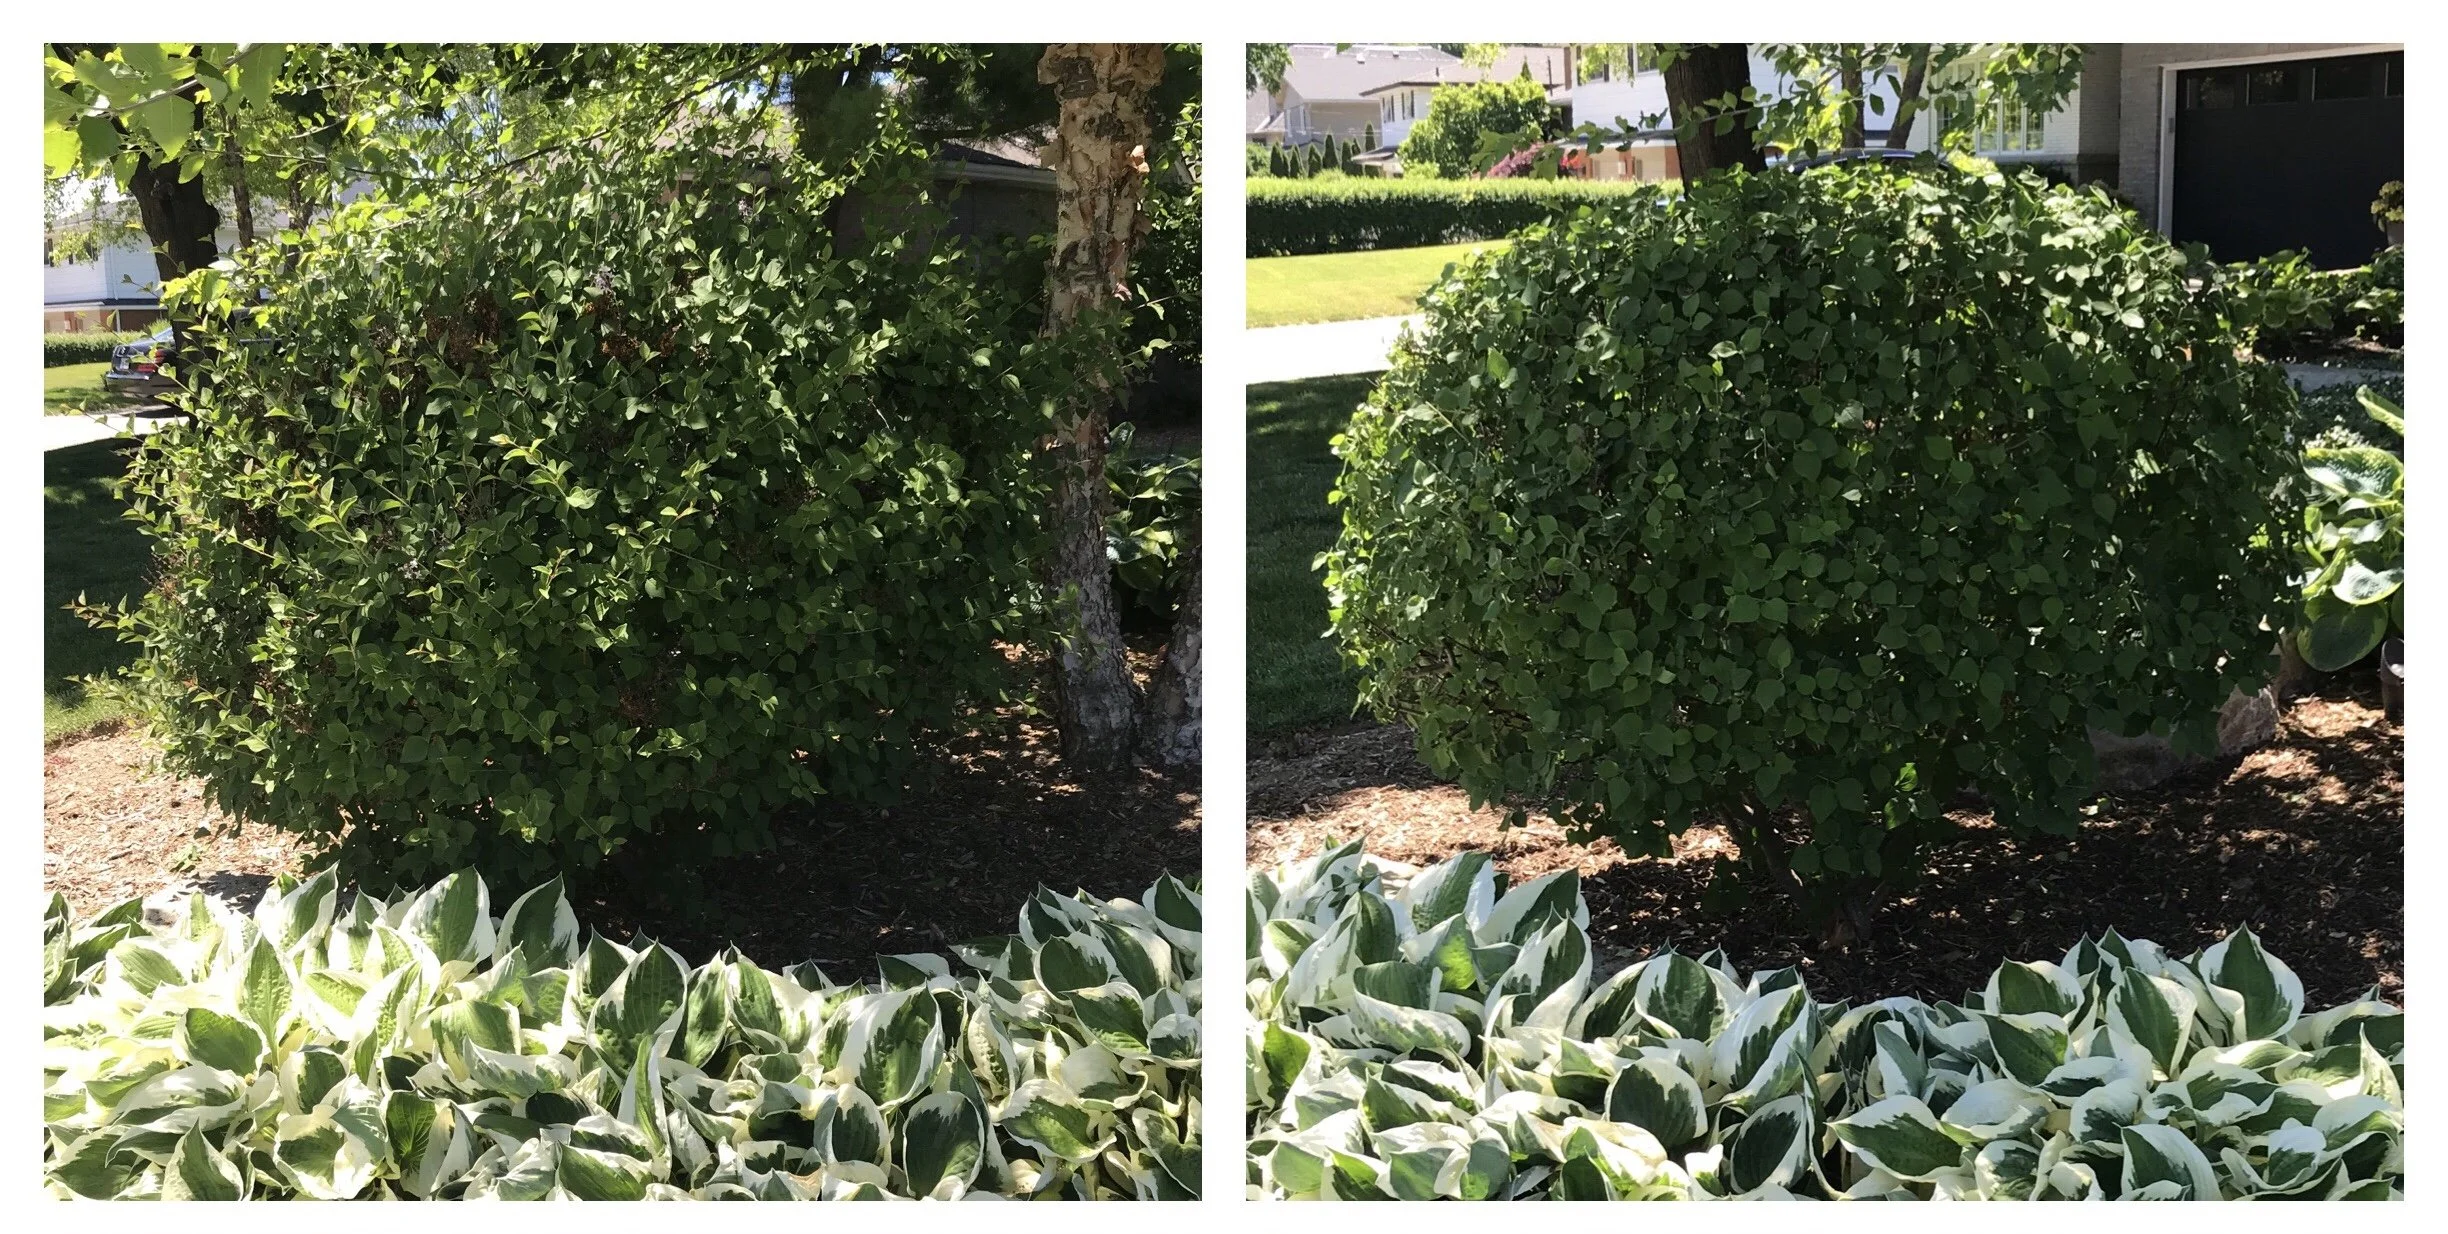
A sprawling ‘Glow Girl’ birch leaf spirea (Spirea betulifolia ‘Tor Gold’) immediately after flowering (left) and after a natural prune (right).

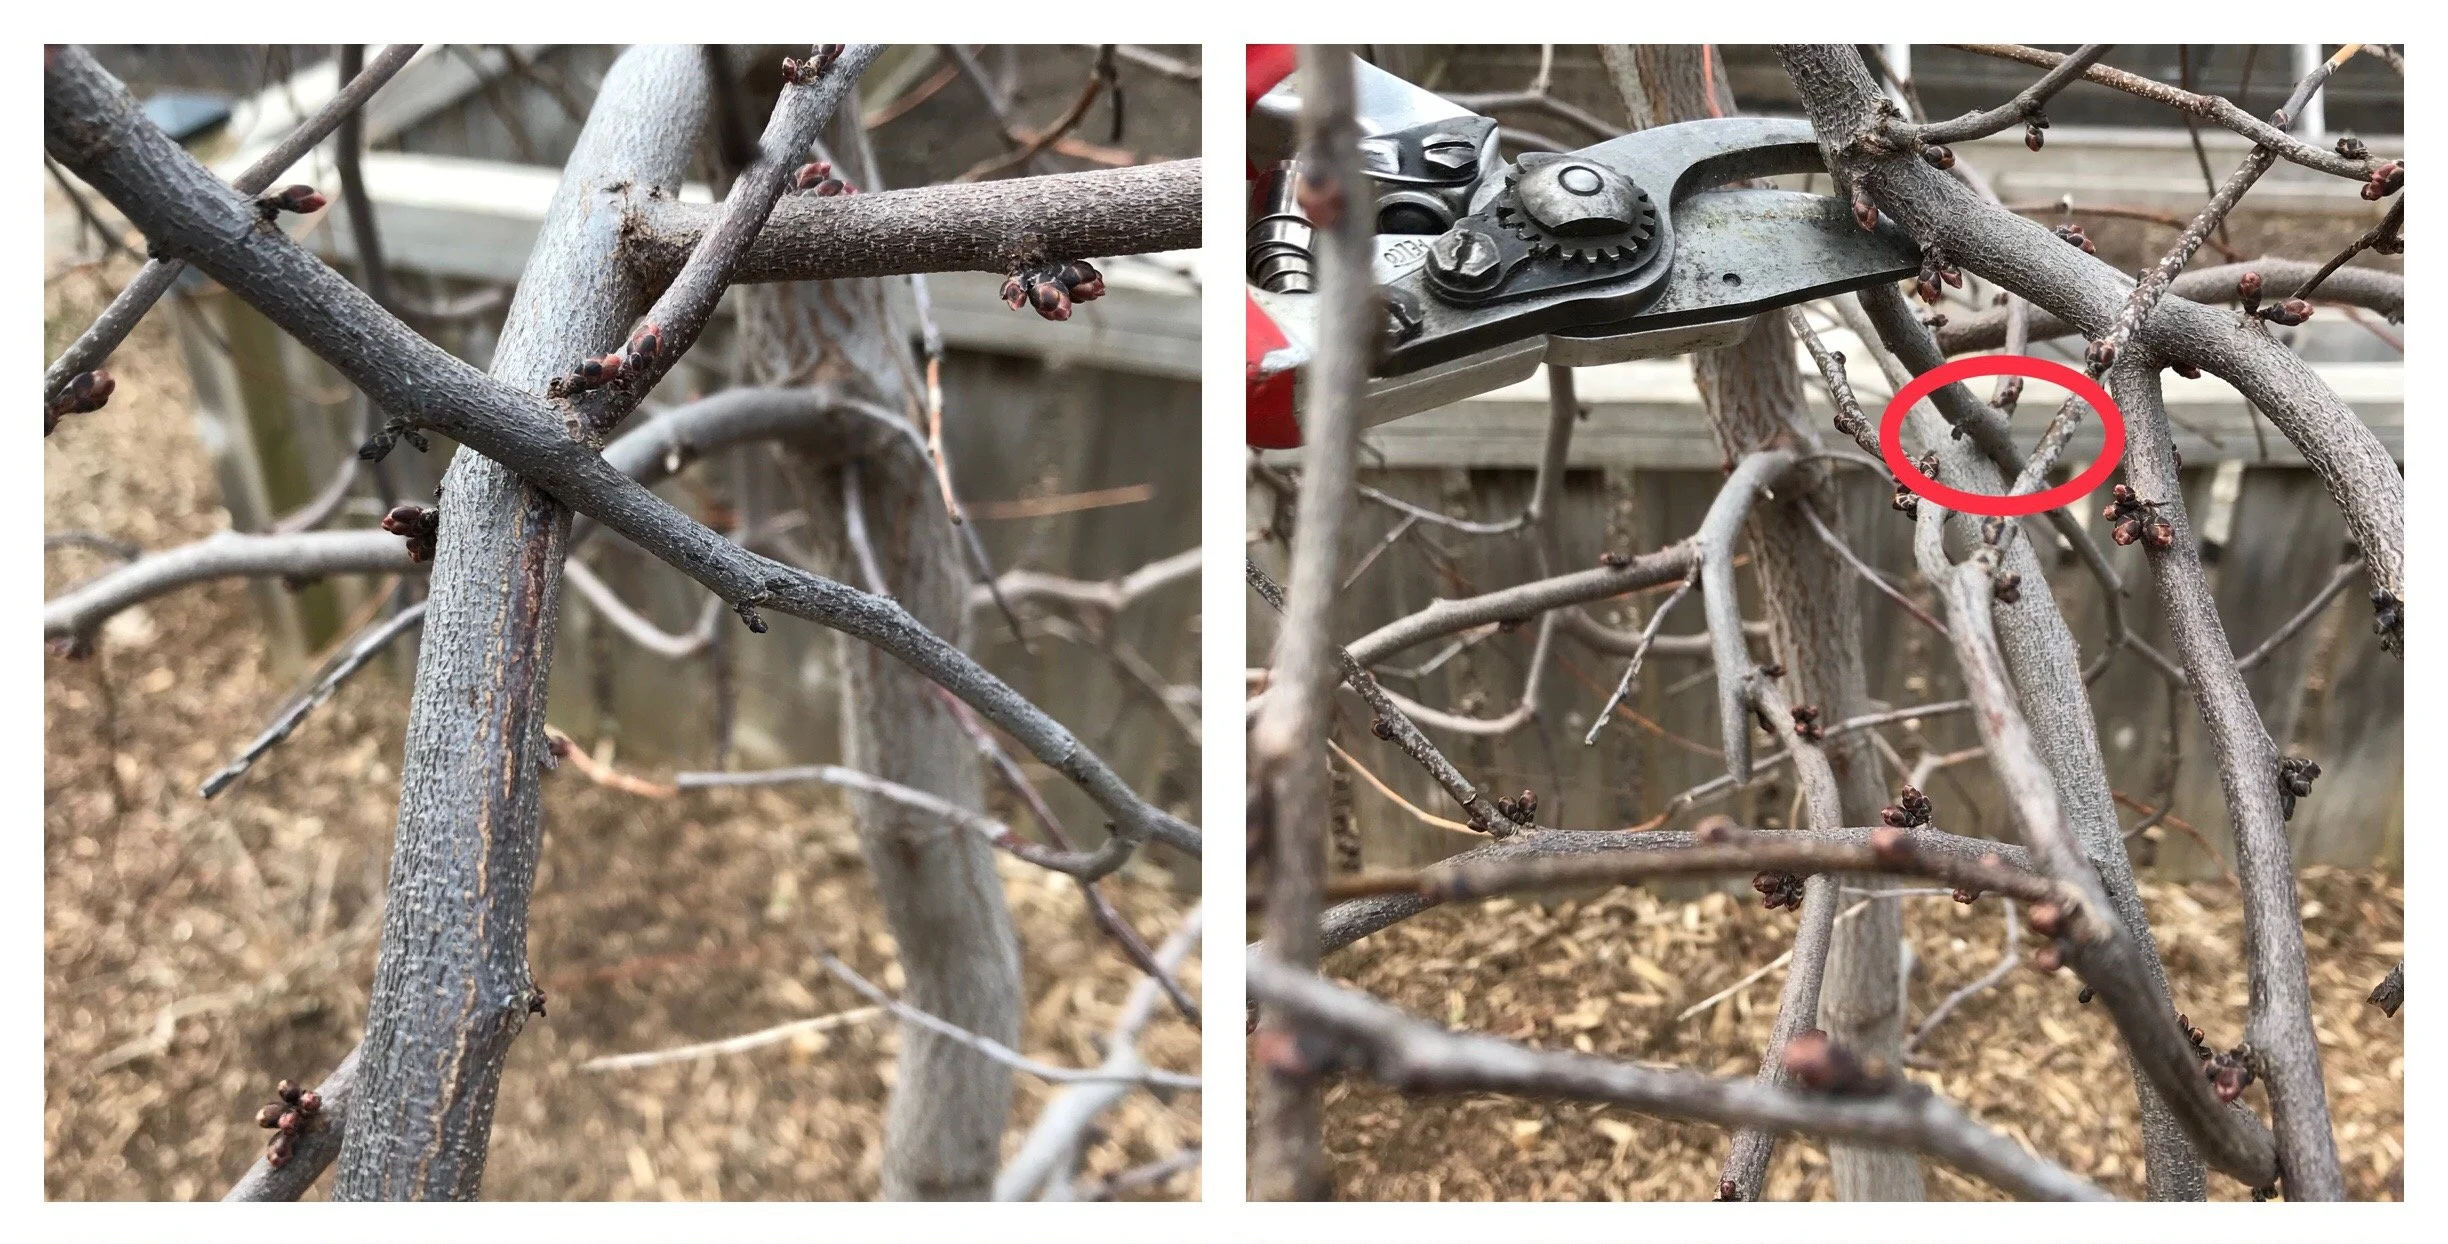
A dwarf Korean lilac (Syringa meyerii pallibin) kept as a globe. In this case hedge shears could have been used, but I reduced the size by thinning the longest branches.

Some Final Thoughts

This type of pruning is subtle- something that can be done yearly or every other year to help limit the size increase of the shrub over time. Doing subtle routine pruning is a much better approach to size control than trying to reign in a plant that is on the verge of outgrowing it’s garden space (which is usually the time when people begin to think about taking action). Drastic pruning on an overgrown plant is not only hard on the plant, it rarely looks natural and is usually a loosing battle. With all that said, overgrown plants are best avoided by ensuring your garden can accommodate the mature size of any tree and shrub that is planted in it.

So have fun and take your time with this pruning technique. It will take much longer than a ‘hedge shear haircut’, but the extra time will pay off when you are sitting in your garden admiring the diversity in forms throughout your yard.

Seasonal Pruning for Size Control

(Originally posted: April 21, 2020)

After reading my last post, you may have been left with a burning question “don’t different trees and shrubs get pruned at different times of the year?”

The answer is yes, BUT… (and you knew that ‘but’ was coming didn’t you?) in the last post we were only discussing the removal of undesirable branches- ones that should be removed to promote good health and proper structure of our trees and shrubs. We were not discussing routine pruning for size control or rejuvenation of our plants. For this type of pruning the timing is everything… so let’s start that discussion here!

Old Wood vs. New Wood

To understand pruning times, we must first discuss the type of wood that trees and shrubs will bloom on. Let’s start with the seemingly not-so-straightforward woody plants: the ones that bloom on old wood. In these plants, flower buds were set last season and it is those buds that will bloom this year. Many of our showiest landscape plants (such as magnolias, serviceberries, dogwoods, lilacs, and rhododendrons) fall into this category, and if you look around the neighbourhood (while social distancing of course), you can often see these buds getting plump and ready for their floral frenzy.

Flower buds on a Cornus kousa (Kousa dogwood) getting ready to pop!

So what happens when you go crazy and do a size-reducing spring prune on these spring-blooming beauties? You remove all their flower buds! (The horror!) So leave these plants alone! In general, these trees and shrubs get pruned right after their bloom period has wrapped up- which also happens to be before they start setting their buds in preparation for next year’s show. So, at this point in the season, we only remove the undesirable branches. Yes, you will sacrifice some blooms by doing this, but don’t forget this is for the health and structure of the plant… we leave the size control (if necessary) for later in the growing season.

An assortment of spring beauties- none of which are pruned until after their flower show (if pruning is necessary)!

OK. So the hard part is over (phew). Let’s move on to the easy plants: trees and shrubs that bloom on new wood. These plants set their buds and bloom on those buds during the same growing season. Because these plants have quite the ‘to do’ list to accomplish before they can actually show-off their blooms, these plants are generally summer-flowering (at the earliest). For these trees and shrubs, the time to prune is now! Seize the day and prune away! No time like the present… OK you get the picture. Some common examples of these plants include:

  • Hydrangea arborescens (such as the common ‘Annabelle’ hydrangea); shown below

  • Hydrangea paniculata (such as the common ‘Grandiflora’ or Pee Gee hydrangea)

  • Buddleia spp. (butterfly bush); shown below

  • Caryopteris incana and Caryopteris x clandonensis (bluebeard); shown below

  • Hibiscus syriacus (rose of Sharon)

Hydrangea arborescens still standing in the spring with it’s pretty dried flowers that provided some interest in the garden over the winter months (left) and another patch of H. arborescens that has been cut down for the spring (right, foreground). This patch is located in a common area so tending to these plants is not really an option for me, but if it were, I would be inclined to prune these shrubs back even further- cutting each stem just above a pair of buds located 10-20 cm up from ground level (oh, and I would remove all the leaves caught up in the base of the plants too!)

A Buddleia (butterfly bush) before and after pruning. Yes they get pruned HARD; pruned down to about 20-30 cm (8-10 in) with all weak growth removed. The photo on the right shows the shrub after some additional branches were removed to achieve a more uniform distribution of branches.

Spring pruning of Caryopteris incana ‘Jason’ (Sunshine bluebeard). Shown during it’s glory days last season (top left) and the same patch after spring pruning (top right)- not much left to see! The best way to tackle this shrub, in my opinion, is to grab a handful of branches and cut the whole thing down by half (bottom left); this removes bulk and allows you to ‘see into’ the shrub better so that the strongest stems can be selected to remain; old, weak, and dead stems can then be pruned out until you are left with a simple branching framework. The plant can then be taken down to a height of 20-30 cm (8-12 in) tall (bottom right).

And there you have it! Hopefully these last two posts have helped shed some light on the various goals of spring pruning. I will continue to provide more examples of pruning in future posts.

It’s now time to head back to the garden, secateurs in hand, and get to work on all those woody plants that flower on new wood.

Have fun and happy gardening!

Turn your 'Pruning Eyes' On!

(Originally posted: April 13, 2020)

So… it’s spring; a strange spring, but spring nonetheless. At a time like this when our whole world has been shaken up, it is nice to see the ‘rebirth’ that comes from soaking rains, longer days, and a higher sun.

Hello little lovelies- it is so nice to see you again!

From a gardening perspective, April is typically a month that starts off slow yet builds to a flurry of activity by the end. While winter and spring play a rousing game of ‘tug-o-war’ for much of the month, I tend to focus on prepping plants for the growing season while the weather is highly changeable (first half of the month) and then conduct my detailed spring cleanups closer to the end of the month when spring is beginning to win it’s battle for seasonal supremacy. By keeping the gardens ‘tucked in’ a little longer, the plants (especially more tender ones) remain protected from any crazy weather events that Mother Nature should decide to throw at us.

(Now I will come clean and admit that I threw this timeline completely out the window in my own garden this year, because let’s face it- we are dealing with a LOT of ‘at home’ time and I am not getting my full garden fix from working in other people’s gardens!)

A Helleborus sp. laughing in the face of a late season snowfall.

PRUNING, PRUNING and MORE PRUNING

With all that said, in theory, my first gardening visits of the season involve A LOT of pruning (which ends up being a little hard on hands that haven’t seen the secateurs all winter…). In this post, I am going to focus on the easy stuff: herbaceous perennials and a few basic maintenance pruning techniques for woody plants.

Pruning of Herbaceous Perennials

Remember all those perennials we left up over the winter for winter-interest or for wildlife value? (See my fall post “Perennials: to chop or not?” if you need to jog your memory!) These herbaceous perennials all died to the ground or to a clump of ‘live’ leaves at the base of the plant (the basal foliage) in the fall. Well the time has come to cut all that dead stuff down while making sure to not cut off any of the basal foliage or new growth emerging from the ground. It’s an easy and gratifying task- not only does it tidy-up the garden substantially, but it often reveals new growth that is starting to push it’s way into the world. (Be sure to whisper ‘hello’!)

Perennials that are ready to be pruned down to make way for new growth- all the dead stuff goes!

Pruning Woody Plants- Basic Maintenance Pruning

I also do a lot of pruning on trees and shrubs, afterall it is the perfect time for pruning for a couple different reasons. First of all, and generally speaking, disease pressure is low during the dormant season and into early spring (and this is a good thing since every pruning cut we make is an opportunity for disease organisms to enter and infect our plants). Secondly we are able to actually see all the branches sans leaves- this certainly helps in identifying what branches to leave in tact and what to prune out.

As we wander through our gardens, secateurs in hand, it is important to keep in mind the types of branches that can and should be pruned out: dead, diseased and damaged branches (the three d’s), crossing branches, and finally water sprouts and suckers. Let’s looks at each of these undesirables:

DEAD branches are not only unsightly but they can attract insect and disease issues; they can also build up over time and overcrowd a shrub and therefore need to be removed.

Dead branches and branches experiencing dieback on a weeping Cercis canadensis (redbud) are quite obvious due to their different colour. They need to be removed by cutting them back to a healthy branch. A few pruning points are shown in the photo on the right.

DISEASED branches should always be removed to prevent the disease from further progressing within the plant and to prevent the plant from being a source of infection to neighbouring susceptible plants (afterall, it’s hard for plants to practice social distancing).

It is important to look for evidence of disease on your trees and shrubs such as the black knot galls on the chokecherry (Prunus virginiana) in the photo on the left, or the stromata/fruiting structures depicted on the corkscrew hazel (Corylus avellana ‘Contorta’) on the right. While these are two diseases that are next to impossible to control, the infected branches should still be pruned out.

DAMAGED branches (such as ones that snapped over the winter, or were nibbled-on by animals) should be pruned back to undamaged tissue. A plant can heal a clean cut much better than a jagged one!

CROSSED branches that rub against one another cause damage to both branches through abrasion. One branch (usually the smaller, weaker one) should be pruned out by following it back to where it connects with another branch and cutting it at that location.

Crossed branches (left) cause damage to the branches through rubbing/abrasion. One of the branches should be removed by cutting it back to a point where it connects to another branch (right); red circle shows the location of the crossed branches.

WATER SPROUTS are really fast growing shoots that grow out of dormant buds on branches and trunks of trees and shrubs. They typically grow straight up, so they tend to stick out like a sore thumb against the normal branching habit of the plant. Their fast growth is not ‘quality’ growth- these shoots are more prone to insect and disease attack plus their attachment points to trees/shrubs are also weaker than the attachment points of ‘proper’ branches. For these reasons, water sprouts should be removed.

Water sprouts emerging from the trunk of a tree (top left) and from a branch (top right) and the corresponding locations of the pruning cuts to be made to eliminate the water sprouts (red lines in bottom pictures).

SUCKERS are vigorous sprouts (similar to water sprouts) that arise from the root system of a woody plant. Unless you are growing a plant for the purpose of naturalization or soil stabilization (where suckering is an acceptable, even welcomed plant characteristic), suckers should be removed with a sharp pull sideways or a snip as close to their point of origin as possible.

Diagram of a shrub with a sucker originating from it’s root system (as indicated by red arrow).

While our trees and shrubs are bare, it is the perfect opportunity to look for all these issues in our plants. It is important to note that we are not pruning for size reduction of our trees and shrubs (we will start this discussion in the next post) we are only removing ‘undesirable branches’ at this point.

A Few Important Pruning Tips

Before I close off this long-winded post, I want to leave you with a few things to keep in mind when pruning:

  • Always use sharp tools (again, clean cuts heal better than jagged ones)

  • Prune on a dry day: water is a great transporter of disease-causing organisms, there is no need to expose pruning wounds to potential sources of disease

  • Sanitize your pruners often! Especially after every cut into dead or diseased wood to prevent the spread of disease to other parts of the plant or to other plants in the garden. I use rubbing alcohol (applied with a bingo dabber) or disinfectant wipes

  • Always cut back into healthy wood (at least 15 centimetres/ 6 inches away from the dead/diseased tissue that you are removing) and cut back to either a bud or where the ‘offending branch’ connects to another branch.

So get your ‘pruning eyes’ on, your ‘pruning hands’ ready and get to work! Happy snipping!